lab
EECS 280 Lab 1: Getting Started
Lab Due Sunday, September 13, 2020, 8:00 pm
Direct autograder link
In this lab, you will set up your development environment for the class, which includes a working terminal and a visual debugger to work more effectively on your projects. Additionally, you will learn to use Git to back up your project and to connect to CAEN to test your code.
You must work on this lab individually.
Files to submit
p1-stats.vcxproj, for Visual Studio userslaunch.json, for VS Code usersproject.pbxproj, for XCode usersmain.cpp, compile check only, “hello world” is OKstats.cpp, compile check only, function stubs are OKstats_tests.cpp, compile check only, no additional tests neededlocalhost.txtcaen.txtgitlog.txt
Completion Criteria/Checklist
To pass this lab, you must finish tasks 1 through 4.
- (Task 1) Visual debugger set up.
- (Task 2) Gitlab web interface for your project 1 with at least 3 commits.
- (Task 3) Successful compilation of project 1 using
makein a local terminal. - (Task 4) Successful compilation of project 1 using
makeon CAEN throughssh.
Task 0 - Preliminaries
You Need a CAEN Account
If you already have a CAEN account (if you took a 100-level CS course, you should have one), you can skip this section. Otherwise, go to the CAEN Hotline (1315 Duderstadt Center) to set up an account as soon as possible. You can still follow the guide; just skip the CAEN section until later.
Complete the Project 1 Setup Guide
Now, in order to set up your development environment, you should complete the setup guide provided with project 1, as it includes everything from installing a terminal and a visual debugger to making some commits in Git and connecting to CAEN.
DO NOT move on to the tasks below until you have completed the setup tutorial.
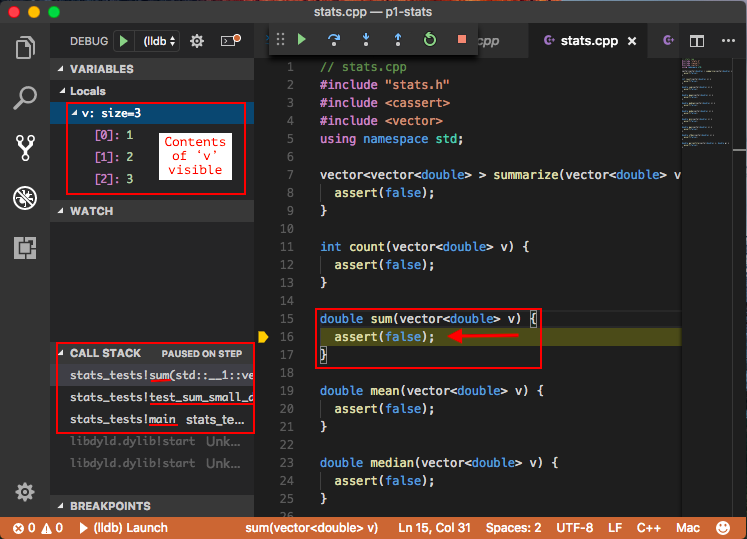
Task 1 - Visual Debugger
For this task, use your visual debugger to run stats_tests.cpp, then
- Step into the
test_sum_small_data_set()function. - Step over until you reach the
sumassertion. - Step into the
sum()function instats.cppand view the content of the input vector.
Submit your visual debugger configuration. Files locations are below, and relative to your project 1 directory. Note that the VS code file is a hidden file.
| Debugger | Config file location |
|---|---|
| Xcode | p1-stats.xcodeproj/project.pbxproj |
| Visual Studio | p1-stats.vcxproj |
| VS Code | .vscode/launch.json |
Xcode
Xcode’s project.pbxproj might not be visible in your finder window. Here’s how to open a finder window to the directory that contains a file.
$ pwd
/Users/awdeorio/src/eecs280/p1-stats
$ open -R p1-stats.xcodeproj/project.pbxproj
VS Code
VS Code’s .vscode/ directory is hidden. You might need to make hidden files visible to locate it.
Task 2 - Gitlab Commit Log
Next, you should open your Gitlab repository for project 1 and go into the Commits tab, where a list of all the uploaded commits should appear. If you followed the setup guide completely and correctly, this page should already show 3 commits, as you can see below.
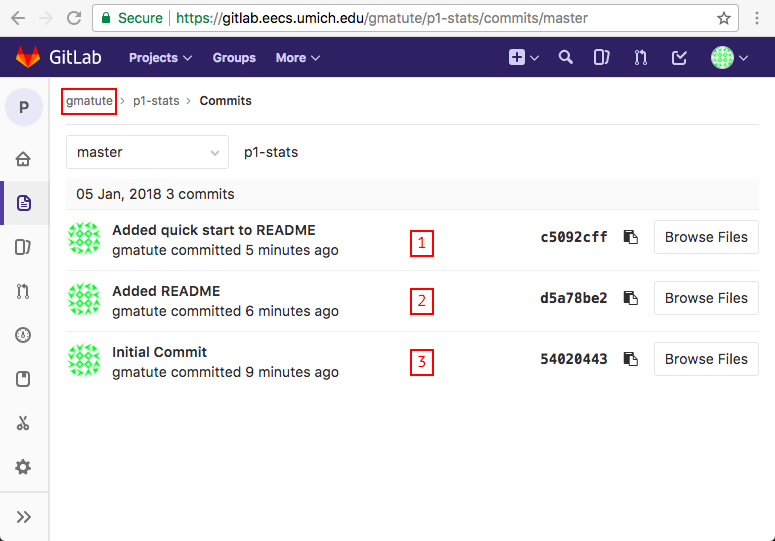
View a text version of the same git log.
$ git log
commit 4d375b45357b4b39822ad48c62c6988910258370 (HEAD -> master, origin/master)
Author: Andrew DeOrio <awdeorio@umich.edu>
Date:   Fri Jan 12 16:14:02 2018 -0500

    Added quick start to README

commit e016bfad5a6371097ea00380aedd3e22ee63f754
Author: Andrew DeOrio <awdeorio@umich.edu>
Date:   Fri Jan 12 16:07:36 2018 -0500

    Added README

commit a13e2521fab6488458c912f598d6d5f89d429484
Author: Andrew DeOrio <awdeorio@umich.edu>
Date:   Fri Jan 12 15:59:25 2018 -0500

    Initial commit.  Starter files with function stubs.
Save the text to a file called gitlog.txt.
$ git log > gitlog.txt
Task 3 - Compiling the Project Locally
Now, open a new terminal window and navigate to your project 1 folder. There you should run the following list of commands, making sure that the compilation is successful.
Command List
$ echo "Hello <your uniqname here>"
$ hostname
$ make clean
$ make stats_tests.exe
$ make stats_public_test.exe
$ make main.exe
This is how it should look, if you do it after finishing the setup guide.
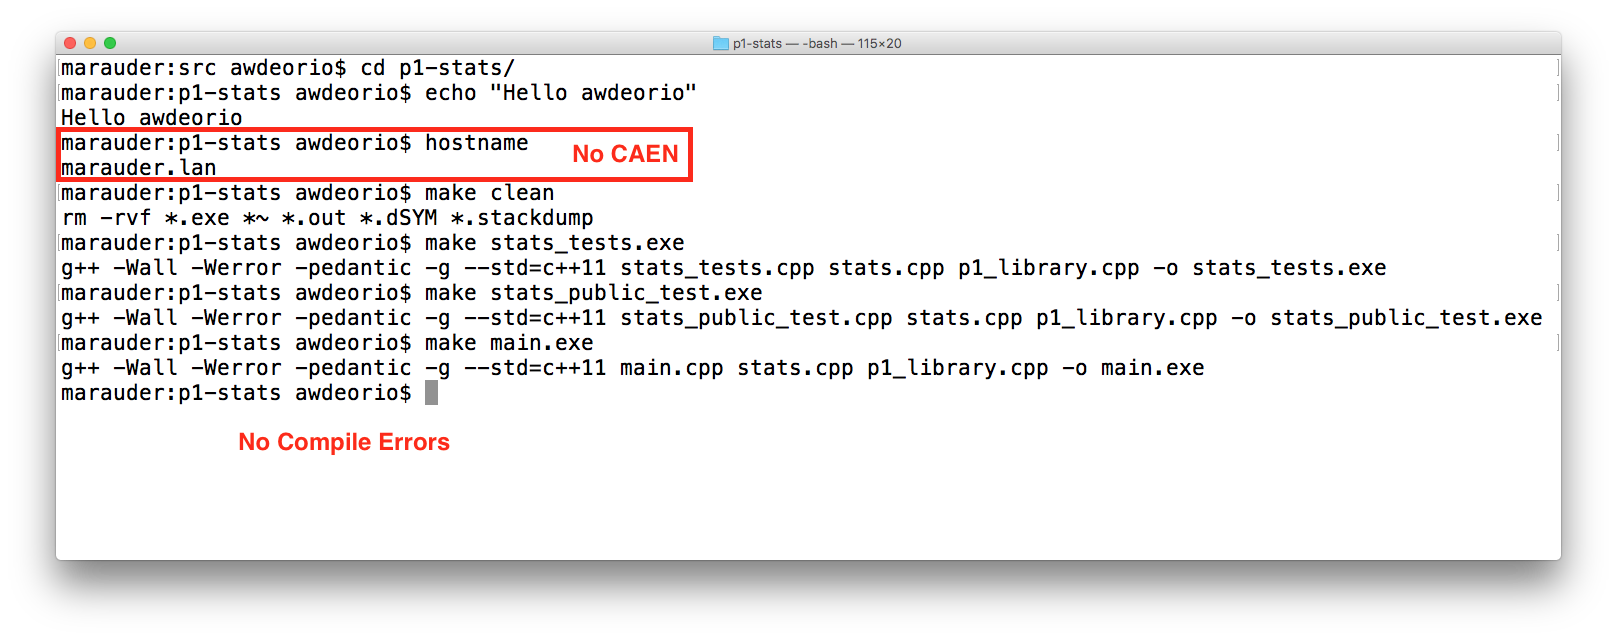
Copy everything in your terminal (both the commands and their output) to a plain text file file called localhost.txt.
Task 4 - Compiling on CAEN (through ssh)
Finally, copy your project over to CAEN and connect through ssh
again. There, you should run the same list of commands as Task 3,
making sure that the compilation is successful.
Also, run these additional commands.
$ whoami
$ whoami | sha1sum
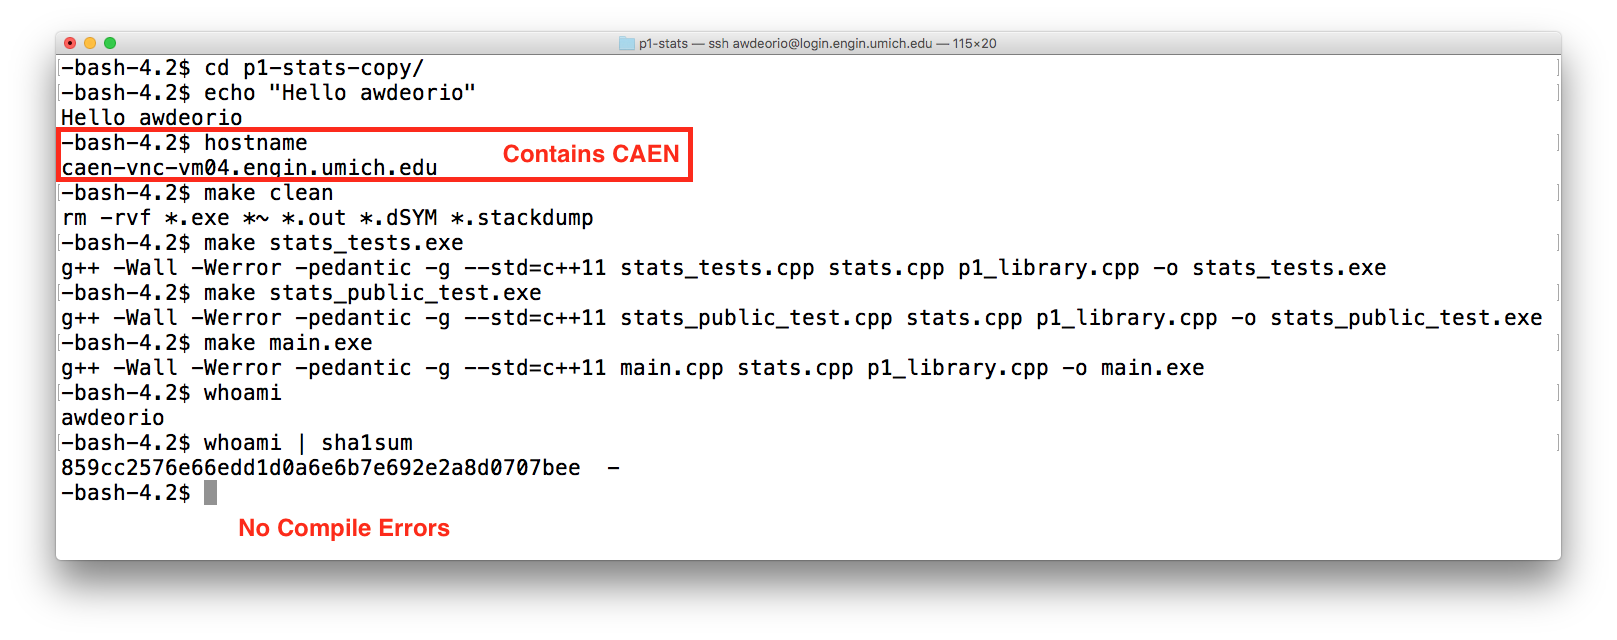
Copy everything in your terminal (both the commands and their output) to a plain text file file called caen.txt.
Submit
Submit all files to the autograder.