p2-cv
EECS 280 Project 2: Computer Vision
Due 8:00pm EST Friday February 9th, 2024. You may work alone or with a partner (partnership guidelines).
Winter 2024 release.
Introduction
Build an image resizing program using a seam-carving algorithm.
The learning goals of this project include Testing, Debugging, Pointers, Arrays, Strings, Streams, IO, and Abstract Data Types in C. You’ll gain practice with C-style pointers, arrays, and structs.
When you’re done, you’ll have a program that uses seam carving for content-aware resizing of images. The algorithm works by finding and removing “seams” in the image that pass through the least important pixels. For a quick introduction, check out this video.
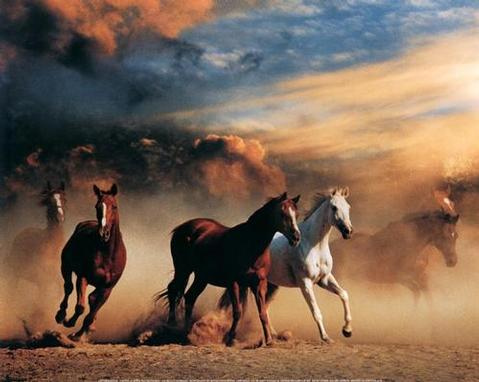 Original Image: 479x382 |
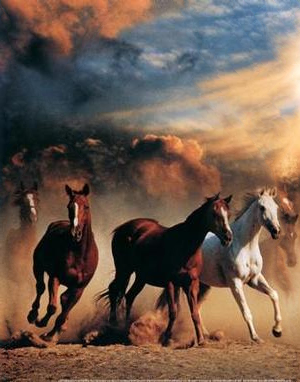 Resized: 300x382 |
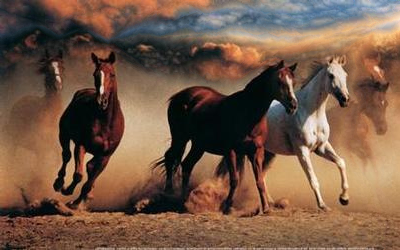 Resized: 400x250 |
Setup
Set up your visual debugger and version control, then submit to the autograder.
Visual debugger
During setup, name your project p2-cv. Use this starter files link: https://eecs280staff.github.io/p2-cv/starter-files.tar.gz
| VS Code | Visual Studio | Xcode |
If you created a main.cpp while following the setup tutorial, rename it to resize.cpp. Otherwise, create a new file resize.cpp. You should end up with a folder with starter files that looks like this. You may have already renamed files like Matrix.cpp.starter to Matrix.cpp.
$ ls
Image.cpp.starter             dog.ppm
Image.hpp                     dog_4x5.correct.ppm
Image_public_test.cpp         dog_cost_correct.txt
Image_test_helpers.cpp        dog_energy_correct.txt
Image_test_helpers.hpp        dog_left.correct.ppm
Image_tests.cpp.starter       dog_removed.correct.ppm
Makefile                      dog_right.correct.ppm
Matrix.cpp.starter            dog_seam_correct.txt
Matrix.hpp                    horses.ppm
Matrix_public_test.cpp        horses_300x382.correct.ppm
Matrix_test_helpers.cpp       horses_400x250.correct.ppm
Matrix_test_helpers.hpp       horses_cost_correct.txt
Matrix_tests.cpp.starter      horses_energy_correct.txt
crabster.ppm                  horses_left.correct.ppm
crabster_50x45.correct.ppm    horses_removed.correct.ppm
crabster_70x35.correct.ppm    horses_right.correct.ppm
crabster_cost_correct.txt     horses_seam_correct.txt
crabster_energy_correct.txt   processing.cpp.starter
crabster_left.correct.ppm     processing.hpp
crabster_removed.correct.ppm  processing_public_tests.cpp
crabster_right.correct.ppm    resize.cpp
crabster_seam_correct.txt     unit_test_framework.hpp
Here’s a short description of each starter file.
| File | Description |
|---|---|
Matrix.hpp |
Interface specification for the Matrix module. |
Image.hpp |
Interface specification for the Image module. |
processing.hpp |
Specification of image processing functions that are pieces of the seam carving algorithm. |
Matrix.cpp.starter |
Starter code for the Matrix module. |
Image.cpp.starter |
Starter code for the Image module. |
processing.cpp.starter |
Starter code for the processing module. |
Matrix_tests.cpp.starter |
Starter code for unit testing the Matrix module. |
Image_tests.cpp.starter |
Starter code for unit testing the Image module. |
Matrix_public_test.cpp |
Public tests for the Matrix module. |
Image_public_test.cpp |
Public tests for the Image module. |
processing_public_tests.cpp |
Tests for the processing module and seam carving algorithm. |
Matrix_test_helpers.hpp Matrix_test_helpers.cpp Image_test_helpers.hpp Image_test_helpers.cpp |
Helper functions for unit tests |
unit_test_framework.hpp |
A simple unit-testing framework |
dog.ppm, crabster.ppm, horses.ppm |
Sample input image files. |
Several _correct.txt files. Several .correct.ppm files. |
Sample (correct) output files used by the processing_public_tests program. |
Makefile |
Helper commands for building and submitting |
Version control
Set up version control using the Version control tutorial.
After you’re done, you should have a local repository with a “clean” status and your local repository should be connected to a remote GitHub repository.
$ git status
On branch main
Your branch is up-to-date with 'origin/main'.

nothing to commit, working tree clean
$ git remote -v
origin	https://github.com/awdeorio/p2-cv.git (fetch)
origin	https://githubcom/awdeorio/p2-cv.git (push)
You should have a .gitignore file (instructions).
$ pwd
/Users/awdeorio/src/eecs280/p2-cv
$ head .gitignore
# This is a sample .gitignore file that's useful for C++ projects.
...
Group registration
Register your partnership (or working alone) on the Autograder using the direct link in the Submission and Grading section. Then, submit the code you have.
Matrix Module
Create a Matrix abstract data type (ADT). Write implementations in Matrix.cpp for the functions declared in Matrix.hpp.
Run the public Matrix tests.
$ make Matrix_public_test.exe
$ ./Matrix_public_test.exe
Complete the EECS 280 Unit Test Framework Tutorial.
Write tests for Matrix in Matrix_tests.cpp using the unit test framework. You’ll submit these tests to the autograder. See the Unit Test Grading section.
$ make Matrix_tests.exe
$ ./Matrix_tests.exe
Submit Matrix.cpp and Matrix_tests.cpp to the Autograder using the link in the Submission and Grading section.
Setup
Rename these files (VS Code (macOS), VS Code (Windows), Visual Studio, Xcode, CLI):
Matrix.cpp.starter->Matrix.cppMatrix_tests.cpp.starter->Matrix_tests.cpp
The Matrix tests should compile and run. Expect them to fail at this point because the Matrix.cpp starter code contains function stubs.
$ make Matrix_public_test.exe
$ ./Matrix_public_test.exe
$ make Matrix_tests.exe
$ ./Matrix_tests.exe
Configure your IDE to debug either the public tests or your own tests.
| Public tests | Your own tests | |
|---|---|---|
| VS Code (macOS) |
Set program name to: |
Set program name to: |
| VS Code (Windows) |
Set program name to: |
Set program name to: |
| XCode |
Include compile sources: |
Include compile sources: |
| Visual Studio |
Exclude files from the build:
|
Exclude files from the build:
|
Interface
A matrix is a two-dimensional grid of elements. For this project, matrices store integer elements and we will refer to locations by row/column. For example, here’s a 3x5 matrix.

The Matrix.hpp file defines a Matrix struct to represent matrices
and specifies the interface for functions to operate on them. The
maximum size for a Matrix is given by constants in Matrix.hpp.
Dimensions of 0 are not allowed.
To create a Matrix, first allocate storage and then use an
initializer function.
Matrix* m = new Matrix; // allocate storage in dynamic memory
Matrix_init(m, 100, 100); // initialize it as a 100x100 matrix
The new operator allocates an object in dynamic memory, giving us a
pointer to the newly created object. We will use dynamic memory to
store Matrix and Image objects, since they are too large to be
created as local variables on the stack.
Once a Matrix is initialized, it is considered valid. Now we can use
any of the functions declared in Matrix.hpp to operate on it.
Matrix_fill(m, 0); // fill with zeros

// fill first row with ones
for (int c = 0; c < Matrix_width(m); ++c) {
  *Matrix_at(m, 0, c) = 1; // see description below
}

Matrix_print(m, cout); // print matrix to cout
Access to individual elements in a Matrix is provided through a
pointer to their location, which can be retrieved through a call to
Matrix_at. To read or write the element, you just dereference the
pointer.
The RMEs in Matrix.hpp give a full specification of the interface for
each Matrix function.
When a Matrix object is no longer needed, its storage should be
deallocated with the delete operator.
delete m;
Implementation
The Matrix struct looks like this:
struct Matrix {
  int width;
  int height;
  int data[MAX_MATRIX_WIDTH * MAX_MATRIX_HEIGHT];
};
Matrix stores a 2D grid of numbers in an underlying one-dimensional
array.
| Interface | Implementation |
|---|---|
|
 |
Each of the functions in the Matrix module takes a pointer to the
Matrix that is supposed to be operated on. In your implementations
of these functions, you should access the width, height, and
data members of that Matrix, but this is the only place you may do
so. To all other code, the individual members are an implementation
detail that should be hidden behind the provided interfaces for the
Matrix module.
Your Matrix_at functions will need to perform the appropriate
arithmetic to convert from a (row,column) pair to an index in the
array, and your Matrix_row and Matrix_column functions will need
to go in the other direction. None of these functions require a
loop, and you’ll find your implementation will be very slow if you use
a loop.
There are two versions of the Matrix_at function to support element
access for both const and non-const matrices. The constness of the
pointer returned corresponds to the Matrix passed in. The
implementations for these will be identical.
Remember that you may call any of the functions in a module as part of
the implementation of another, and in fact you should do this if it
reduces code duplication. In particular, no function other than
Matrix_row, Matrix_column, and the two versions of Matrix_at
should access the data member directly – call one of these
functions instead. (However, you will not be able to call one
version of Matrix_at from the other due to the differences in
constness.)
Pro-tip: Use assert() to check the conditions in the REQUIRES clause. If other code breaks the interface, that’s a bug and you want to know right away! Here’s an example.
// primer-spec-highlight-start
// REQUIRES: mat points to a valid Matrix
//           0 <= row && row < Matrix_height(mat)
//           0 <= column && column < Matrix_width(mat)
// primer-spec-highlight-end
// EFFECTS:  Returns a pointer to the element in
//           the Matrix at the given row and column.
int* Matrix_at(Matrix* mat, int row, int column) {
  // primer-spec-highlight-start
  assert(0 <= row && row < mat->height);
  assert(0 <= column && column < mat->width);
  // primer-spec-highlight-end
  // ...
}
Some things can’t be checked, for example that a pointer points to a valid Matrix.
Testing
Test your Matrix functions to ensure that your implementations conform to specification in the RME.
Heed the Small Scope Hypothesis. There is no need for large Matrix structs. (Other than an as edge case for max size.) Think about what makes tests meaningfully different.
Create Matrix objects with the new operator, and then destroy them with delete when you are done.
TEST(test_fill_basic) {
  Matrix *mat = new Matrix;
  // ...
  delete mat;
}
Do not create a Matrix on the stack. It’s too large.
TEST(bad_example) {
  Matrix mat;  // BAD! TOO BIG FOR STACK
}
Respect the interfaces for the modules you are testing. Do not access member variables of the structs directly. Do not test inputs that break the REQUIRES clause for a function.
TEST(test_bad) {
  Matrix *mat = new Matrix;
  const int width = 3;
  const int height = 5;
  const int value = 42;
  Matrix_init(mat, 3, 5);
  Matrix_fill(mat, value);

  for(int r = 0; r < height; ++r) {
    for(int c = 0; c < width; ++c) {
      // primer-spec-highlight-start
      ASSERT_EQUAL(mat.data[r][c], value);  // BAD! DO NOT access member directly
      // primer-spec-highlight-end
    }
  }

  delete mat;
}
Sometimes you need to use one Matrix one function while testing another. For example, you need Matrix_at to test Matrix_fill.
TEST(test_fill_basic) {
  Matrix *mat = new Matrix;
  const int width = 3;
  const int height = 5;
  const int value = 42;
  Matrix_init(mat, 3, 5);
  // primer-spec-highlight-start
  Matrix_fill(mat, value);
  // primer-spec-highlight-end

  for(int r = 0; r < height; ++r) {
    for(int c = 0; c < width; ++c) {
      // primer-spec-highlight-start
      ASSERT_EQUAL(*Matrix_at(mat, r, c), value);
      // primer-spec-highlight-end
    }
  }

  delete mat;
}
Use an ostringstream to test Matrix_print().
#include <sstream>

TEST(test_matrix_print) {
  Matrix *mat = new Matrix;
  Matrix_init(mat, 1, 1);

  *Matrix_at(mat, 0, 0) = 42;
  ostringstream expected;
  expected << "1 1\n"
           << "42 \n";
  ostringstream actual;
  Matrix_print(mat, actual);
  ASSERT_EQUAL(expected.str(), actual.str());

  delete mat;
}
In your Matrix tests, you may use the functions provided in Matrix_test_helpers.hpp. Do not use Image_test_helpers.hpp in your Matrix tests.
Image Module
Create an Image abstract data type (ADT). Write implementations in Image.cpp for the functions declared in Image.hpp.
Run the public Image tests.
$ make Image_public_test.exe
$ ./Image_public_test.exe
Write tests for Image in Image_tests.cpp using the Unit Test Framework. You’ll submit these tests to the autograder. See the Unit Test Grading section.
$ make Image_tests.exe
$ ./Image_tests.exe
Submit Image.cpp and Image_tests.cpp to the Autograder using the link in the Submission and Grading section.
Setup
Rename these files (VS Code (macOS), VS Code (Windows), Visual Studio, Xcode, CLI):
Image.cpp.starter->Image.cppImage_tests.cpp.starter->Image_tests.cpp
The Image tests should compile and run. Expect them to fail at this point because the Image.cpp starter code contains function stubs.
$ make Image_public_test.exe
$ ./Image_public_test.exe
$ make Image_tests.exe
$ ./Image_tests.exe
Write tests for Image in Image_tests.cpp using the Unit Test Framework. You’ll submit these tests to the autograder. See the Unit Test Grading section.
$ make Image_tests.exe
$ ./Image_tests.exe
Configure your IDE to debug either the public tests or your own tests.
| Public tests | Your own tests | |
|---|---|---|
| VS Code (macOS) |
Set program name to: |
Set program name to: |
| VS Code (Windows) |
Set program name to: |
Set program name to: |
| XCode |
Include compile sources: |
Include compile sources: |
| Visual Studio |
Exclude files from the build :
|
Exclude files from the build:
|
Interface
An Image is similar to a Matrix, but contains Pixels instead of
integers. Each Pixel includes three integers, which represent red,
green, and blue (RGB) color components. Each component takes on an
intensity value between 0 and 255. The Pixel type is considered
“Plain Old Data” (POD), which means it doesn’t have a separate
interface. We just use its member variables directly. Here is the
Pixel struct and some examples:
struct Pixel {
  int r;  // red
  int g;  // green
  int b;  // blue
}
|

(255,0,0) |

(0,255,0) |

(0,0,255) |

(0,0,0) |

(255,255,255) |

(100,100,100) |
|

(101,151,183) |

(124,63,63) |

(163,73,164) |
Below is a 5x5 image and its conceptual representation as a grid of pixels.
![]()
The maximum size for an Image is the same as the maximum size for a Matrix.
Dimensions of 0 are not allowed. To create an Image, first allocate
storage and then use an initializer function. There are several
initializer functions, but for now we’ll just use the basic one.
Image* img = new Image; // allocate storage in dynamic memory
Image_init(img, 5, 5); // initialize it as a 5x5 image
Once an Image is initialized, it is considered valid. Now we can use
any of the functions declared in Image.hpp to operate on it.
Pixel um_blue = { 0, 46, 98 };
Pixel um_maize = { 251, 206, 51 };
Image_fill(img, um_blue); // fill with blue

// fill every other column with maize to make stripes
for (int c = 0; c < Image_width(img); ++c) {
  if (c % 2 == 0) { // only even columns
    for (int r = 0; r < Image_height(img); ++r) {
      Image_set_pixel(img, r, c, um_maize);
    }
  }
}
To read and write individual Pixels in an Image, use the
Image_get_pixel and Image_set_pixel functions, respectively.
The RMEs in Image.hpp give a full specification of the interface for
each Image function.
When an Image object is no longer needed, its storage should be
deallocated with the delete operator.
delete img;
PPM Format
The Image module also provides functions to read and write Images
from/to the PPM image format. Here’s an example of an Image and its
representation in PPM.
| Image | Image Representation in PPM |
|---|---|
 |
P3 5 5 255 0 0 0 0 0 0 255 255 250 0 0 0 0 0 0 255 255 250 126 66 0 126 66 0 126 66 0 255 255 250 126 66 0 0 0 0 255 219 183 0 0 0 126 66 0 255 219 183 255 219 183 0 0 0 255 219 183 255 219 183 255 219 183 0 0 0 134 0 0 0 0 0 255 219 183 |
The PPM format begins with these elements, each separated by whitespace:
P3(Indicates it’s a “Plain PPM file”.)WIDTH HEIGHT(Image width and height, separated by whitespace.)255(Max value for RGB intensities. We’ll always use 255.)
This is followed by the pixels in the image, listed with each row on a separate line. A pixel is written as three integers for its RGB components in that order, separated by whitespace.
To write an image to PPM format, use the Image_print function that
takes in a std::ostream. This can be used in conjunction with file
I/O to write an image to a PPM file. The Image_print function must
produce a PPM using whitespace in a very specific way so that we can
use diff to compare your output PPM file against a correct PPM file.
See the RME for the full details.
To create an image by reading from PPM format, use the Image_init
function that takes in a std::istream. This can be used in
conjunction with file I/O to read an image from a PPM file. Because we
may be reading in images generated from programs that don’t use
whitespace in the same way that we do, the Image_init function must
accommodate any kind of whitespace used to separate elements of the
PPM format (if you use C++ style I/O with >>, this should be no
problem). Other than variance in whitespace (not all PPM files put
each row on its own line, for example), you may assume any input
to this function is in valid PPM format. (Some PPM files may contain
“comments”, but you do not have to account for these.)
See Working with PPM Files for more information on working with PPM files and programs that can be used to view or create them on various platforms.
Implementation
The Image struct looks like this:
struct Image {
  int width;
  int height;
  Matrix red_channel;
  Matrix green_channel;
  Matrix blue_channel;
};
The Interface for Image makes it seem like we have a grid of
Pixels, but the Image struct actually stores the information for
the image in three separate Matrix structs, one for each of the RGB
color channels. There are no Pixels in the underlying
representation, so your Image_get_pixel function must pack the RGB
values from each color Matrix into a Pixel to be returned.
Likewise, Image_set_pixel must unpack RGB values from an input
Pixel and store them into each Matrix.
Each of the functions in the Image module takes a pointer to the
Image that is supposed to be operated on. When you are writing
implementations for these functions, you may be tempted to access
members of the Matrix struct directly (e.g.
img->red_channel.width, img->green_channel.data[x]). Don’t do it!
They aren’t part of the interface for Matrix, and you should not use
them from the outside. Instead, use the Matrix functions that are
part of the interface (e.g. Matrix_width(&img->red_channel),
Matrix_at(&img->green_channel, r, c)).
In your implementation of the Image_init functions, space for the
Matrix members will have already been allocated as part of the
Image. However, you still need to initialize these with a call to
Matrix_init to ensure they are the right size!
The Image struct contains width and height members. These are
technically redundant, since each of the Matrix members also keeps
track of a width and height, but having them around should make the
implementations for your functions easier to read.
Respect the Interfaces!
Our goal is to use several modules that work together through
well-defined interfaces, and to keep the implementations separate from
those interfaces. The interfaces consist of the functions we provide
in the .hpp file for the module, but NOT the member variables of the
struct. The member variables are part of the implementation, not the
interface!
This means you may access member variables directly (i.e. using . or
->) when you’re writing code within their module, but never from the
outside world! For example, let’s consider the Image module. If I’m
writing the implementation of a function inside the module, like
Image_print, it’s fine to use the member variable height directly:
void Image_print(const Image *img, std::ostream& os) {
  ...
  // loop through all the rows
  for (int r = 0; r < img->height; ++r) {
    // do something
  }
  ...
}
This is fine, because we assume the person who implements the module
is fully aware of all the details of how to use height correctly.
However, if I’m working from the outside, then using member variables
directly is very dangerous. This code won’t work right:
int main() {
  // Make a 400x300 image (sort of)
  Image* img = new Image;
  img->width = 400;
  img->height = 300;
  // do something with img but it doesn't work :(
  ...
  delete img;
}
The problem is that we “forgot” about initializing the width and
height of the Matrix structs that make up each color channel in the
image. Instead, we should have used the Image_init function from the
outside, which takes care of everything for us.
Here’s the big idea - we don’t want the “outside world” to have to worry about the details of the implementation, or even to know them at all. We want to support substitutability, so that the implementation can change without breaking outside code (as long as it still conforms to the interface). Using member variables directly from the outside messes this all up. Don’t do it! It could break your code and this will be tested on the autograder!
An exception to this rule is the Pixel struct. It’s considered to be
a “Plain Old Data” (POD) type. In this case, the interface and the
implementation are the same thing. It’s just an aggregate of three
ints to represent an RGB pixel - nothing more, nothing less.
We should note there are patterns used in C-style programming that hide away the definition of a struct’s members and prevent us from accidentally accessing them outside the correct module. Unfortunately, this causes complications that we don’t have all the tools to deal with yet (namely dynamic memory management). We’ll also see that C++ adds some built-in language mechanisms to control member accessibility. For now, you’ll just have to be careful!
Copying Large Structs
In many cases you will find it useful to copy Matrix and Image
structs in your code. This is supported by the interface, so feel free
to use it wherever useful. However, try to avoid making unnecessary
copies, as this can slow down your code.
As an example, let’s say you wanted to add a border to a Matrix and
print it without changing the original. You could write this:
...
// Assume we have a variable mat that points to a Matrix

// Make a copy of mat and add the border. original remains unchanged
Matrix* mat_border = new Matrix(*mat); // need to dereference mat to copy it
Matrix_fill_border(mat_border, 0);

// print the bordered version
Matrix_print(mat_border, os);
...
For posterity, we will note that the main reason it is fine to use the
built-in copying behavior for the Matrix and Image structs is that
neither holds an object or resource indirectly through a pointer.
Thus, a straightforward member-by-member copy of the structs is
sufficient and the built-in copy is fine. If this doesn’t seem
relevant right now, just wait until we get to the “Big Three” in
lecture :).
Testing
Respect the interfaces for the modules you are testing. Do not access member variables of the structs directly. Do not test inputs that break the REQUIRES clause for a function.
Make sure to create Image objects with the new operator, and then destroy them with delete when you are done. Do not declare an Image on the stack, as they are too large to be placed in a stack frame. Declaring an Image* is fine, since a pointer is small.
You may use stringstreams to simulate file input and/or output for your unit tests. You may also use the image files dog.ppm, crabster.ppm, and horses.ppm, but no others.
In your Image tests, you may use the functions provided in Image_test_helpers.hpp. Do not use Matrix_test_helpers.hpp in your Image tests.
Processing Module
The processing module contains several functions that perform image
processing operations. Some of these provide an interface for
content-aware resizing of images, while others correspond to
individual steps in the seam carving algorithm.
The main interface for using content-aware resizing is through the
seam_carve, seam_carve_width and seam_carve_height functions.
These functions use the seam carving algorithm to shrink either an
image’s width or height in a context-aware fashion. The seam_carve
function adjusts both width and height, but width is always done
first. For this project, we only support shrinking an image, so the
requested width and height will always be less than or equal to the
original values.
Write implementations in processing.cpp for the functions declared in processing.hpp.
Run the public processing tests.
$ make processing_public_tests.exe
$ ./processing_public_tests.exe
Submit processing.cpp to the Autograder using the link in the Submission and Grading section.
Setup
Rename this file (VS Code (macOS), VS Code (Windows), Visual Studio, Xcode, CLI):
processing.cpp.starter->processing.cpp
The Processing tests should compile and run. Expect them to fail at this point because the processing.cpp starter code contains function stubs.
$ make processing_public_tests.exe
$ ./processing_public_tests.exe
Configure your IDE to debug public tests.
| VS Code (macOS) |
Set program name to: |
| VS Code (Windows) |
Set program name to: |
| XCode |
Include compile sources: |
| Visual Studio |
Exclude files from the build:
|
Energy Matrix
compute_energy_matrix: The seam carving algorithm works by removing seams that pass through
the least important pixels in an image. We use a pixel’s energy as a
measure of its importance.
To compute a pixel’s energy, we look at its neighbors. We’ll call them N (north), S (south), E (east), and W (west) based on their direction from the pixel in question (we’ll call it X).

The energy of X is the sum of the squared differences between its N/S and E/W neighbors:
energy(X) = squared_difference(N, S) + squared_difference(W, E)
The static function squared_difference is provided as part of the
starter code. Do not change the implementation of the
squared_difference function.
To construct the energy Matrix for the whole image, your function
should do the following:
- Initialize the energy
Matrixwith the same size as theImageand fill it with zeros. - Compute the energy for each non-border pixel, using the formula above.
- Find the maximum energy so far, and use it to fill in the border pixels.
Cost Matrix
compute_vertical_cost_matrix: Once the energy matrix has been computed, the next step is to find the
path from top to bottom (i.e. a vertical seam) that passes through the
pixels with the lowest total energy (this is the seam that we would
like to remove).
We will begin by answering a related question - given a particular pixel, what is the minimum energy we must move through to get to that pixel via any possible path? We will refer to this as the cost of that pixel. Our goal for this stage of the algorithm will be to compute a matrix whose entries correspond to the cost of each pixel in the image.
Now, to get to any pixel we have to come from one of the three pixels above it.
|
|
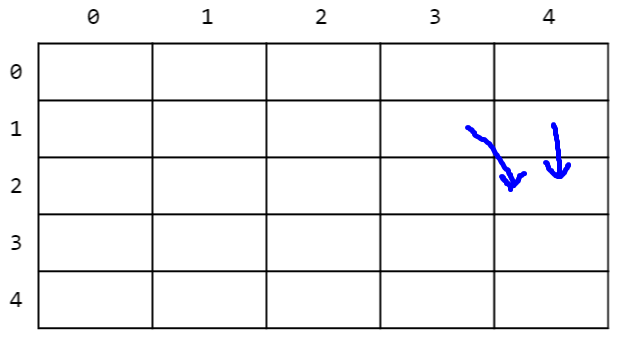
We would want to choose the least costly from those pixels, which
means the minimum cost to get to a pixel is its own energy plus the
minimum cost for any pixel above it. This is a recurrence relation.
For a pixel with row r and column c, the cost is:
cost(r, c) = energy(r, c) + min(cost(r-1, c-1),
                                cost(r-1, c),
                                cost(r-1, c+1))
Use the Matrix_min_value_in_row function to help with this equation.
Of course, you need to be careful not to consider coming from pixels
outside the bounds of the Matrix.
We could compute costs recursively, with pixels in the first row as our base case, but this would involve a lot of repeated work since our subproblems will end up overlapping. Instead, let’s take the opposite approach…
- Initialize the cost
Matrixwith the same size as the energyMatrix. - Fill in costs for the first row (index 0). The cost for these pixels is just the energy.
- Loop through the rest of the pixels in the
Matrix, row by row, starting with the second row (index 1). Use the recurrence above to compute each cost. Because a pixel’s cost only depends on other costs in an earlier row, they will have already been computed and can just be looked up in theMatrix.
Minimal Vertical Seam
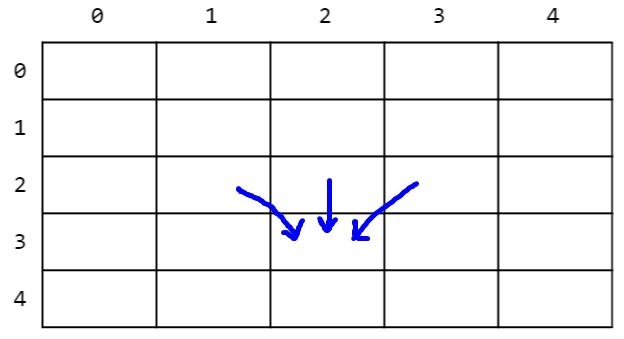
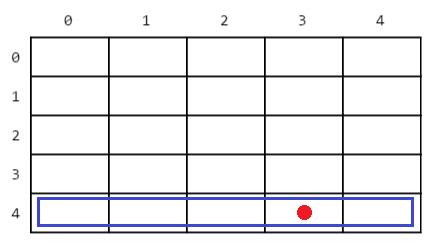
find_minimal_vertical_seam: The pixels in the bottom row of the image correspond to the possible
endpoints for any seam, so we start with the one of those that is
lowest in the cost matrix.
|
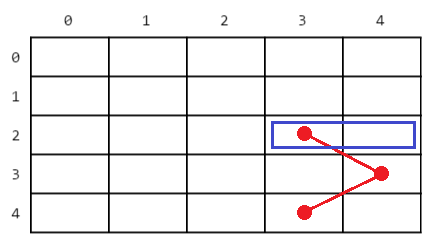
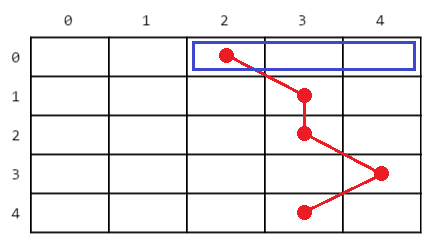
Now, we work our way up, considering where we would have come from in the row above. In the pictures below, the blue box represents the “pixels above” in each step.
|
|
For ties, pick the leftmost. |
Repeat until you reach the top row. |
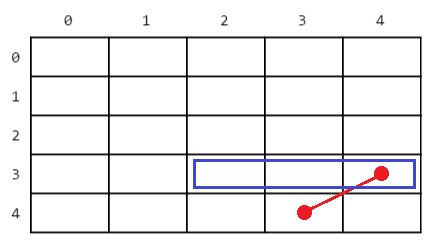
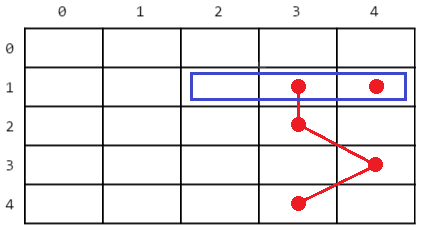
You will find the Matrix_column_of_min_value_in_row function useful
here. Each time you process a row, put the column number of the best
pixel in the seam array, working your way from the back to front.
(i.e. The last element corresponds to the bottom row.)

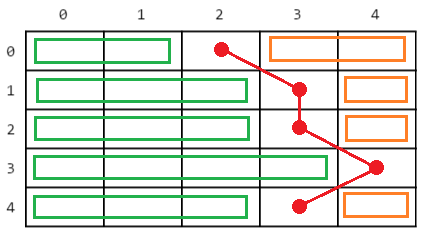
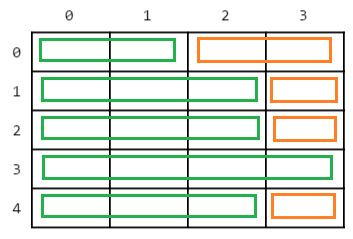
Removing a Vertical Seam
remove_vertical_seam:
The seam array passed into this function contains the column numbers
of the pixels that should be removed in each row, in order from the
top to bottom rows. To remove the seam, copy the image one row at a
time, first copying the part of the row before the seam (green),
skipping that pixel, and then copying the rest (orange).
|
|
You should copy into a smaller auxiliary Image and then back into
the original, because there is no way to change the width of an
existing image. Do not attempt to use Image_init to “resize” the
original - it doesn’t preserve existing data in an Image.
Seam Carving Algorithm
We can apply seam carving to the width of an image, the height, or both.
seam_carve_width
To apply seam carving to the width, remove the minimal cost seam until the image has reached the appropriate width.
- Compute the energy matrix
- Compute the cost matrix
- Find the minimal cost seam
- Remove the minimal cost seam
seam_carve_height
To apply seam carving to the height, just do the following:
- Rotate the image left by 90 degrees
- Apply
seam_carve_width - Rotate the image right by 90 degrees
seam_carve
To adjust both dimensions:
- Apply
seam_carve_width - Apply
seam_carve_height
Testing
We have provided the processing_public_tests.cpp file that contains
a test suite for the seam carving algorithm that runs each of the
functions in the processing module and compares the output to the
“_correct” files included with the project.
You should write your own tests for the processing module, but you
do not need to turn them in. You may do this either by creating a copy
of processing_public_tests.cpp and building onto it, or writing more
tests from scratch. Pay attention to edge cases.
Use the Makefile to compile the test with this command:
$ make processing_public_tests.exe
Then you can run the tests for the dog, crabster, and horses
images as follows:
$ ./processing_public_tests.exe
You can also run the tests on just a single image:
$ ./processing_public_tests.exe dog
$ ./processing_public_tests.exe crabster
$ ./processing_public_tests.exe horses
When the test program runs, it will also write out image files containing the results from your functions before asserting that they are correct. You may find it useful to look at the results from your own code and visually compare them to the provided correct outputs when debugging the algorithm.
The seam carving tests work sequentially and stop at the first deviation from correct behavior so that you can identify the point at which your code is incorrect.
Resize Program
The main resize program supports content-aware resizing of images via a command line interface.
Create a resize.cpp file and write your implementations of the driver program there.
Compile and run the program. The interface section explains each command line argument.
$ make resize.exe
$ ./resize.exe horses.ppm horses_400x250.ppm 400 250
Setup
If you created a main.cpp while following the setup tutorial, rename it to resize.cpp. Otherwise, create a new file resize.cpp (VS Code (macOS), VS Code (Windows), Visual Studio, Xcode, CLI).
Add “hello world” code if you haven’t already.
#include <iostream>
using namespace std;

int main() {
  cout << "Hello World!\n";
}
The resize program should compile and run.
$ make resize.exe
$ ./resize.exe
Hello World!
Configure your IDE to debug the resize program.
| VS Code (macOS) |
Set program name to: |
| VS Code (Windows) |
Set program name to: |
| XCode |
Include compile sources: |
| Visual Studio |
Exclude files from the build:
|
Configure command line arguments (VS Code (macOS), VS Code (Windows), Xcode, Visual Studio). We recommend starting with the smallest input, dog.ppm dog_4x5.out.ppm 4 5.
To compile, run, and test the smallest input at the command line:
$ make resize.exe
$ ./resize.exe dog.ppm dog_4x5.out.ppm 4 5
$ diff dog_4x5.out.ppm dog_4x5.correct.ppm
Interface
To resize the file
horses.ppm to be 400x250 pixels
and store the result in the file
horses_400x250.ppm, we
would use the following command:
$ ./resize.exe horses.ppm horses_400x250.ppm 400 250
In particular, here’s what each of those means:
| Argument | Meaning |
|---|---|
horses.ppm |
The name of the input file from which the image is read. |
horses_400x250.ppm |
The name of the output file to which the image is written. |
400 |
The desired width for the output image. |
250 |
The desired height for the output image. (Optional) |
The program is invoked with three or four arguments. If no height argument is supplied, the original height is kept (i.e. only the width is resized). If your program takes about 30 seconds for large images, that’s ok. There’s a lot of computation involved.
Error Checking
The program checks that the command line arguments obey the following rules:
- There are 4 or 5 arguments, including the executable name itself
(i.e.
argv[0]). - The desired width is greater than 0 and less than or equal to the original width of the input image.
- The desired height is greater than 0 and less than or equal to the original height of the input image.
If any of these are violated, use the following lines of code (literally) to print an error message.
cout << "Usage: resize.exe IN_FILENAME OUT_FILENAME WIDTH [HEIGHT]\n"
     << "WIDTH and HEIGHT must be less than or equal to original" << endl;
Your program should then exit with a non-zero return value from
main. Do not use the exit function in the standard library, as
it does not clean up local objects.
If the input or output files cannot be opened, use the following lines
of code (literally, except change the variable filename to whatever
variable you have containing the name of the problematic file) to
print an error message, and then return a non-zero value from main.
cout << "Error opening file: " << filename << endl;
You do not need to do any error checking for command line arguments or file I/O other than what is described in this section. However, you must use precisely the error messages given here in order to receive credit.
Implementation
Your main function should not contain much code. It should just
process the command line arguments, check for errors, and then call
the appropriate functions from the other modules to perform the
desired task.
Submission and Grading
Submit to the autograder using this direct autograder link: https://autograder.io/web/project/2422.
Matrix.cppMatrix_tests.cppImage.cppImage_tests.cppprocessing.cppresize.cpp
This project will be autograded for correctness, comprehensiveness of your test cases, and programming style. See the style checking tutorial for the criteria and how to check your style automatically on CAEN.
Testing
Run all the unit tests and system tests. This includes the public tests we provided and the unit tests that you wrote.
$ make test
Pro-tip: Run commands in parallel with make -j.
$ make -j4 test
Unit Test Grading
We will autograde your Matrix and Image unit tests.
Your unit tests must use the unit test framework.
A test suite must complete less than 5 seconds and contain 50 or fewer TEST() items. One test suite is one _test.cpp file.
To grade your unit tests, we use a set of intentionally buggy instructor solutions. You get points for catching the bugs.
- We compile and run your unit tests with a correct solution.
- Tests that pass are valid.
- Tests that fail are invalid, they falsely report a bug.
- We compile and run all of your valid tests against each buggy solution.
- If any of your tests fail, you caught the bug.
- You earn points for each bug that you catch.
Requirements and Restrictions
It is our goal for you to gain practice with good C-style object-based programming and proper use of pointers, arrays, and structs. Here are some (mandatory) guidelines.
| DO | DO NOT |
|---|---|
| Use either traversal by pointer or traversal by index, as necessary | |
Modify .cpp files |
Modify .hpp files |
Put any extra helper functions in the .cpp files and declare them static |
Modify .hpp files |
#include a .hpp file from a module that does not require the code in the .hpp file (e.g. including Image.hpp from Matrix.cpp), as this introduces an incorrect dependency between modules |
|
Use these libraries: <iostream>, <fstream>, <cstdlib>, <sstream>, <cassert>, <string> |
Use other libraries |
#include a library to use its functions |
Assume that the compiler will find the library for you (some do, some don’t) |
| Use C-style strings when processing command line arguments | |
| Use C++ style strings when working with streams and file I/O | |
const global variables |
Global or static variables that are not const |
| Pass large structs or classes by pointer | Pass large structs or classes by value |
| Pass by pointer-to-const when appropriate | “I don’t think I’ll modify it …” |
Use dynamic memory (new and delete) to create and destroy Matrix and Image objects in processing.cpp, resize.cpp, and test cases |
Use dynamic memory anywhere else (Matrix.cpp, Image.cpp) |
Diagnosing Slow Code
If your code runs too slowly (especially on larger images like the “horses”
example), a tool called perf can analyze which parts of your code take
the most time. See the Perf Tutorial for details.
Undefined Behavior and Memory Leaks
If your code produces different results on different machine (e.g.
your computer vs. the autograder), the likely source is undefined behavior.
Refer to the ASAN Tutorial
for how to use the Address Sanitizer (ASAN) to check for undefined behavior.
You can also use ASAN to detect memory leaks, which occur when your code
creates an object using new but never frees the memory for that object
with the delete operator.
Reach Goals
Optionally check out the project reach goals. Reach goals are entirely optional.
Acknowledgments
This project was written by James Juett, Winter 2016 at the University of Michigan. It was inspired by Josh Hug’s “Nifty Assignment” at SIGCSE 2015.