p4-web
EECS 280 Project 4: Web
Due 8:00pm Tuesday November 14, 2023. You may work alone or with a partner (partnership guidelines).
Fall 2023 release.
IMPORTANT
For Fall 2023, the driver portion of the project that implements the web API (api.cpp) is OPTIONAL and is NOT GRADED on the autograder. The List.hpp and List_tests.cpp files are all that is required. You are still welcome to do the whole project if you like, or to return to it on your own after the course has finished.
Introduction
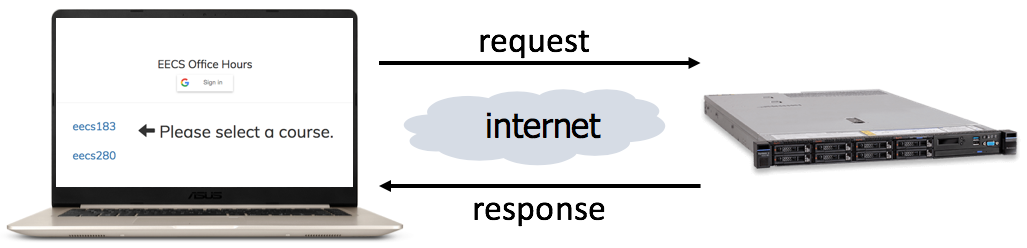
Build a web server for an office hours queue.
The learning goals of this project include Container ADTs, Dynamic Memory, The Big Three, Linked Lists, and Iterators. You will gain experience with new and delete, constructors and destructors, and the list data structure.
When you’re done, you’ll have a working web application accessible through your browser.

Web app background
When you browse to a web site like our EECS 280 office hours queue http://eecsoh.org, your computer makes a request and a server returns a response.
Simple web pages
Your web browser makes a request when you visit a page. First, it connects to the eecsoh.org server, then requests the /index.html page (“no filename” is a shortcut for index.html).
GET / HTTP/1.1
The eecsoh.org server responds with plain text in HTML format. Your browser renders the HTML, adding colors, formatting and images.
HTTP/1.1 200 OK

<html>
  <body>
    EECS Office Hours
    ...
  </body>
</html>
HTTP
HTTP is the protocol that describes what requests and responses should look like. Both are plain text sent from one computer to another computer through the internet. Let’s take a second look at the previous example in more detail.
The request contains an action (GET), a path (/eecsoh/), a version (HTTP/1.1) and some headers (Host: localhost). Headers are key/value pairs separated by a colon.
GET /eecsoh/ HTTP/1.1
Host: localhost
The response contains a version (HTTP/1.1), a status code (200), status description (OK), some headers (Content-Type ... and Content-Length ...), and a body (<html> ... </html>).
HTTP/1.1 200 OK
Content-Type: text/html; charset=utf-8
Content-Length: 3316

<html>
  <body>
    EECS Office Hours
    ...
  </body>
</html>
Web 2.0 applications
Web 2.0 applications like the EECS 280 office hours queue interact with the user. Let’s take a look at what happens when you click the “Sign Up” button.
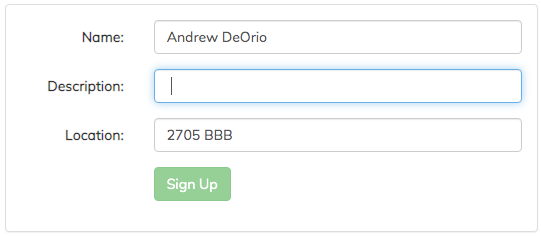
First, the client’s web browser sends an HTTP request to the server. The request might look like this. Notice that the request includes a body with the information entered by the client. The information is in a machine-readable format called JSON.
POST /api/queue/tail/ HTTP/1.1
Host: localhost
Content-Type: application/json; charset=utf-8
Content-Length: 59

{
    "uniqname": "awdeorio",
    "location": "2705 BBB"
}
Next, the server receives the request sent by the client. The server acts on the request.
- Deserialize the JSON data, converting it into a data structure
- Modify an internal data structure, possibly a list
- Create a response data structure
- Serialize the response data structure, converting it to JSON
- Send the response to the client
The response to the client might look like this.
HTTP/1.1 201 Created
Content-Type: application/json; charset=utf-8
Content-Length: 78

{
    "location": "2705 BBB",
    "position": 1,
    "uniqname": "awdeorio"
}
Finally, the client receives the response and updates the web page, showing the up-to-date queue in this example.
A server that responds to requests with data instead of HTML is called a REST API (REpresentational State Transfer). REST APIs return data in a machine-readable format like JSON.
Our tutorial Working with JSON provides many more details about the JSON format.
Setup
Set up your visual debugger and version control, then submit to the autograder.
Visual debugger
During setup, name your project p4-web. Use this starter files link: https://eecs280staff.github.io/p4-web/starter-files.tar.gz
| VS Code | Visual Studio | Xcode |
If you created a main.cpp while following the setup tutorial, rename it to api.cpp. Otherwise, create a new file api.cpp. You should end up with a folder with starter files that look like this. You may have already renamed files like List.hpp.starter to List.hpp.
$ ls
List.hpp                public_error01.in           test03.in
List_compile_check.cpp  public_error01.out.correct  test03.out.correct
List_public_test.cpp    server.py                   test04.in
List_tests.cpp          test01.in                   test04.out.correct
Makefile                test01.out.correct          test05.in
index.html              test02.in                   test05.out.correct
json.hpp                test02.out.correct          unit_test_framework.hpp
Here’s a short description of each starter file.
| File(s) | Description |
|---|---|
List.hpp.starter |
Starter code for the List. |
List_tests.cpp |
Your List unit tests. |
List_compile_check.cpp |
Compile check test for List |
List_public_test.cpp |
A very small test case for List. |
test01.intest01.out.correcttest02.intest02.out.correct test03.intest03.out.correct test04.intest04.out.correct test05.intest05.out.correct |
Simple test cases for the server program. |
Makefile |
Helper commands for building. |
json.hpp |
Library for working with JSON. |
unit_test_framework.hpp |
A simple unit-testing framework. |
server.py |
Python wrapper script for running the office hours queue server. |
index.html |
HTML for the office hours queue. |
Version control
Set up version control using the Version control tutorial.
After you’re done, you should have a local repository with a “clean” status and your local repository should be connected to a remote GitHub repository.
$ git status
On branch main
Your branch is up-to-date with 'origin/main'.

nothing to commit, working tree clean
$ git remote -v
origin	https://github.com/awdeorio/p4-web.git (fetch)
origin	https://githubcom/awdeorio/p4-web.git (push)
You should have a .gitignore file (instructions).
$ head .gitignore
# This is a sample .gitignore file that's useful for C++ projects.
...
Group registration
Register your partnership (or working alone) on the Autograder. Then, submit the code you have.
Linked list
Implement your doubly linked list in List.hpp. List.hpp.starter provides prototypes for each function. Because List is a templated container, function implementations go in List.hpp. There is no List.cpp.
While the List from lecture was singly linked, this List is doubly linked.
This List also contains an iterator interface.
Do not modify the public interface of the List class. Implement a doubly-linked list. No arrays or vectors, etc. Manage memory allocation so that there are no memory leaks (Leak checking tutorial).
Compile and run the provided compile check and List tests.
$ make List_compile_check.exe
$ make List_public_test.exe
$ ./List_public_test.exe
Write tests for List in List_tests.cpp using the Unit Test Framework. You’ll submit these tests to the autograder. See the Unit Test Grading section.
$ make List_tests.exe
$ ./List_tests.exe
Pro-tip: Getting an error about typename? Take a look at our reference on Typename.
Setup
Rename these files (VS Code (macOS), VS Code (Windows), Visual Studio, Xcode, CLI):
List.hpp.starter->List.hppList_tests.cpp.starter->List_tests.cpp
Edit List.hpp, adding a function stub for each function prototype in List.hpp. Here’s an example.
template<typename T>
bool List<T>::empty() const {
  assert(false);
}
The List tests should compile and run. The public tests will fail until you implement the functions. The file for your test cases (List_tests.cpp) will pass because it initially only contains ASSERT_TRUE(true).
$ make List_public_test.exe
$ ./List_public_test.exe
$ make List_tests.exe
$ ./List_tests.exe
At this point, we haven’t written the List Iterator, so List_compile_check.exe won’t compile. You’ll need to take a look at the lecture about iterators and write your own tests. After you do, use the provided compile check like this:
$ make List_compile_check.exe
Configure your IDE to debug either the public tests or your own tests.
| Public tests | Your own tests | |
|---|---|---|
| VS Code (macOS) |
Set program name to: |
Set program name to: |
| VS Code (Windows) |
Set program name to: |
Set program name to: |
| Xcode |
Include compile sources: |
Include compile sources: |
| Visual Studio |
Exclude files from the build:
|
Exclude files from the build:
|
Queue REST API (Optional)
IMPORTANT
For Fall 2023, the driver portion of the project that implements the web API (api.cpp) is OPTIONAL and is NOT GRADED on the autograder. The List.hpp and List_tests.cpp files are all that is required. You are still welcome to do the whole project if you like, or to return to it on your own after the course has finished.
The top-level application is an office hours queue REST API that reads requests from stdin (cin) and writes responses to stdout (cout). Requests and responses are formatted using a simplified subset of real HTTP.
Write the program in api.cpp. Run it with one of our provided input files.
$ make api.exe
$ ./api.exe < test01.in
HTTP/1.1 200 OK
Content-Type: application/json; charset=utf-8
Content-Length: 160

{
    "queue_head_url": "http://localhost/queue/head/",
    "queue_list_url": "http://localhost/queue/",
    "queue_tail_url": "http://localhost/queue/tail/"
}
Setup
Make sure you have created api.cpp. (VS Code (macOS), VS Code (Windows), Visual Studio, Xcode, CLI).
Add “hello world” code if you haven’t already.
#include <iostream>
using namespace std;

int main() {
  cout << "Hello World!\n";
}
The API program should compile and run.
$ make api.exe
$ ./api.exe
Hello World!
Configure your IDE to debug the API program.
| VS Code (macOS) |
Set program name to: |
| VS Code (Windows) |
Set program name to: |
| Xcode |
Include compile sources: |
| Visual Studio |
Exclude files from the build:
|
Set up input redirection (VS Code (macOS), VS Code (Windows), XCode, Visual Studio) to read test01.in.
To compile and run the API program with one test:
$ make api.exe
$ ./api.exe < test01.in
Libraries
A queue contains items stored in first-in-first-out order: the first item to be added is also the first one to be removed. Queues are commonly implemented using a linked list. A linked list allows insertion and removal at both ends, allowing items to be added at one end and removed at the other. This is in contrast to a vector, which only allows insertion and removal at one end.

Use the standard library list so you can get started on this project right away. Later, you’ll implement your own linked list that works just like the STL.
The REST API will implement the requests summarized in this table. The following sections provide more detail.
| Request | Description |
|---|---|
GET /api/ |
Read routes |
GET /api/queue/ |
Read all queue positions |
GET /api/queue/head/ |
Read first queue position |
POST /api/queue/tail/ |
Create last queue position |
DELETE /api/queue/head/ |
Delete first queue position |
Design
Use a linked list containing a struct or class to store your queue. Don’t use json objects to store your queue or the data in your queue.
Here’s an outline of how to structure your solution.
- Read a request with
cin- To read data, create a temporary
jsonobject and usecin(Reading JSON from a stream)
- To read data, create a temporary
- Read or write the
listdata structure - Write a response with
cout- To write data, create a temporary
jsonobject and usecout(Writing JSON to a stream)
- To write data, create a temporary
Your code should be structured in such a way that your program will return 0 if it fails to read the beginning of a request from cin (i.e. it fails to read one of “GET /api/”, “POST /api/queue/tail/”, etc. because of some error, including end of file). NOTE: Your code should not return from main if it encounters an error as described in Error handling.
Pro-tip: Here’s how the instructors started their solution.
#include <list>

struct Student {
  // ...
};

class OHQueue {
public:
  void run() {
    while(/* Read request with cin */) {
      // Read or write queue member variable
      // Write response with cout
    }
  }

private:
  std::list<Student> queue;
};

int main() {
  OHQueue ohqueue;
  OHQueue.run();
}
Sample browser session
The following is an example of a browser session that adds three people to an empty queue and then retrieves the full queue.
The browser starts by sending a POST request to the /api/queue/tail path to add a student. The request body includes the student’s uniqname and location.
POST /api/queue/tail/ HTTP/1.1
Host: localhost
Content-Type: application/json; charset=utf-8
Content-Length: 58

{
    "uniqname": "awdeorio",
    "location": "Table 3"
}
The server returns the following response, indicating success:
HTTP/1.1 201 Created
Content-Type: application/json; charset=utf-8
Content-Length: 77

{
    "location": "Table 3",
    "position": 1,
    "uniqname": "awdeorio"
}
The browser sends a second POST request to add another student:
POST /api/queue/tail/ HTTP/1.1
Host: localhost
Content-Type: application/json; charset=utf-8
Content-Length: 57

{
    "uniqname": "akamil",
    "location": "Table 15"
}
The server responds:
HTTP/1.1 201 Created
Content-Type: application/json; charset=utf-8
Content-Length: 76

{
    "location": "Table 15",
    "position": 2,
    "uniqname": "akamil"
}
The browser adds one more student to the queue:
POST /api/queue/tail/ HTTP/1.1
Host: localhost
Content-Type: application/json; charset=utf-8
Content-Length: 75

{
    "uniqname": "jklooste",
    "location": "Desks behind bookshelves"
}
The server response:
HTTP/1.1 201 Created
Content-Type: application/json; charset=utf-8
Content-Length: 94

{
    "location": "Desks behind bookshelves",
    "position": 3,
    "uniqname": "jklooste"
}
The browser now sends a GET request to the /api/queue/ path to obtain the entire queue:
GET /api/queue/ HTTP/1.1
Host: localhost
Content-Type: application/json; charset=utf-8
Content-Length: 0
The server responds with the contents of the queue in order:
HTTP/1.1 200 OK
Content-Type: application/json; charset=utf-8
Content-Length: 412

{
    "count": 3,
    "results": [
        {
            "location": "Table 3",
            "position": 1,
            "uniqname": "awdeorio"
        },
        {
            "location": "Table 15",
            "position": 2,
            "uniqname": "akamil"
        },
        {
            "location": "Desks behind bookshelves",
            "position": 3,
            "uniqname": "jklooste"
        }
    ]
}
The requests for this example are in the file test02.in, and the responses are in test02.out.correct.
Request format
Every request has the same format. The only parts that change are the method (GET in this example), the path (/api/ in this example), the content length (0 here) and the body (empty here).
The content length in a request is the number of bytes in the body. Two newlines between the headers and the body are not included in the content length. Each body is followed a newline, which is included in the content length.
In this example, the two newlines separating the headers and the body are present, but the body is empty. That is why you see a blank line at the end and Content-Length: 0.
GET /api/ HTTP/1.1
Host: localhost
Content-Type: application/json; charset=utf-8
Content-Length: 0
Response format
Every response has the same format. The only parts that change are the response code (200 in this example), the content length (160) and the body. The body is everything inside the curly braces { ... } followed by a trailing newline.
HTTP/1.1 200 OK
Content-Type: application/json; charset=utf-8
Content-Length: 160

{
    "queue_head_url": "http://localhost/queue/head/",
    "queue_list_url": "http://localhost/queue/",
    "queue_tail_url": "http://localhost/queue/tail/"
}
Your implementation must order key-value pairs alphabetically by key. Use the process in Writing JSON to a stream to ensure that the ordering is correct.
The content length in a response is the number of bytes in the body. Two newlines between the headers and the body are not included in the content length. Each body is followed a newline, which is included in the content length.
Pro-tip: Compute the content length like the example in Writing JSON to a stream.
Error handling
You don’t need to handle these errors. In other words, your implementation can assume that these things are correct:
- Requests are properly formatted
- HTTP method is one of
GET,DELETE, orPOST Content-Lengthof a request is correct- All
GETandDELETErequests will have aContent-Length: 0 - If
Content-Length: 0, there will be no JSON body
You must handle the following errors:
- HTTP path is not valid. The path must exactly match one of
/api/,/api/queue/,/api/queue/head/, or/api/queue/tail/, including the slashes. - HTTP method is not appropriate for the path. For example,
POST /api/.
If one of the errors above occurs, read the remainder of the request, including any headers or body. Then, return the following response after reading the entire request. Note that there is a blank line after Content-Length: 0.
HTTP/1.1 400 Bad Request
Content-Type: application/json; charset=utf-8
Content-Length: 0
GET /api/
The /api/ route accepts a GET request and returns a list of URLs supported by this REST API. It always returns the same data. See the examples in Request format and Response format for the input and output for this path.
Run the unit test.
$ make api.exe
$ ./api.exe < test01.in > test01.out
$ diff test01.out test01.out.correct
Pro-tip: Debug output differences using diff -y -B, which shows differences side-by-side and ignores whitespace. We’ll use the less pager so we can scroll through the long terminal output. Press q to quit.
$ ./api.exe < test01.in > test01.out
$ diff -y -B test01.out test01.out.correct | less  # q to quit
POST /api/queue/tail/
The /api/queue/tail/ route accepts a POST request and creates one new person on the queue. As a simplification, we do not check if a person is already on the queue, thus the same uniqname may appear multiple times.
Example request
POST /api/queue/tail/ HTTP/1.1
Host: localhost
Content-Type: application/json; charset=utf-8
Content-Length: 58

{
    "uniqname": "jackgood",
    "location": "Table 5"
}
Example response
HTTP/1.1 201 Created
Content-Type: application/json; charset=utf-8
Content-Length: 77

{
    "location": "Table 5",
    "position": 1,
    "uniqname": "jackgood"
}
Run the unit test.
$ make api.exe
$ ./api.exe < test04.in > test04.out
$ diff test04.out test04.out.correct
GET /api/queue/head/
The /api/queue/head route accepts a GET request and returns the person at the head of the queue. Fields are in the order shown by the example, and the person at the head of the queue always has position 1. If the queue is empty, return a 400 error.
Example request
GET /api/queue/head/ HTTP/1.1
Host: localhost
Content-Type: application/json; charset=utf-8
Content-Length: 0
Example response
HTTP/1.1 200 OK
Content-Type: application/json; charset=utf-8
Content-Length: 77

{
    "location": "Table 3",
    "position": 1,
    "uniqname": "awdeorio"
}
Run the unit test.
$ make api.exe
$ ./api.exe < test03.in > test03.out
$ diff test03.out test03.out.correct
GET /api/queue/
The /api/queue/ route accepts a GET request and returns a list of everyone on the queue, including location, position and uniqname in that order. The list is ordered by position, which always starts with 1 for the person currently at the head of the queue.
Example request
GET /api/queue/ HTTP/1.1
Host: localhost
Content-Type: application/json; charset=utf-8
Content-Length: 0
Example response
HTTP/1.1 200 OK
Content-Type: application/json; charset=utf-8
Content-Length: 412

{
    "count": 3,
    "results": [
        {
            "location": "Table 3",
            "position": 1,
            "uniqname": "awdeorio"
        },
        {
            "location": "Table 15",
            "position": 2,
            "uniqname": "akamil"
        },
        {
            "location": "Desks behind bookshelves",
            "position": 3,
            "uniqname": "jklooste"
        }
    ]
}
If the queue is empty, the response should be:
HTTP/1.1 200 OK
Content-Type: application/json; charset=utf-8
Content-Length: 40

{
    "count": 0,
    "results": null
}
Run the unit test.
$ make api.exe
$ ./api.exe < test02.in > test02.out
$ diff test02.out test02.out.correct
DELETE /api/queue/head/
The /api/queue/head/ route accepts a DELETE request and removes the person at the head of the queue.
Example request
DELETE /api/queue/head/ HTTP/1.1
Host: localhost
Content-Type: application/json; charset=utf-8
Content-Length: 0
Example response
HTTP/1.1 204 No Content
Content-Type: application/json; charset=utf-8
Content-Length: 0
If the queue is empty, return a 400 error.
Run the unit test.
$ make api.exe
$ ./api.exe < test05.in > test05.out
$ diff test05.out test05.out.correct
Real web server (Optional)
Once you have a working solution for the office hours queue API as specified, you have a working back-end for a real office hours queue web server!
First, make sure your API passes all the unit tests.
$ make test-api
Build and start the server. You might need to install Python 3 with brew install python3 (macOS) or apt-get install python3 (WSL or Linux).
$ make api.exe
$ python3 server.py
Starting server on localhost:8000
In a web browser, navigate to http://localhost:8000/index.html. You should see a web page. A shortcut is http://localhost:8000.
Now try http://localhost:8000/api/. You should see JSON data.
Your browser is sending a GET request over the network. Let’s try it using the command line using a second terminal.
$ curl localhost:8000/api/
{
    "queue_head_url": "http://localhost/queue/head/",
    "queue_list_url": "http://localhost/queue/",
    "queue_tail_url": "http://localhost/queue/tail/"
}
The server.py script listens for incoming network requests. If the client request path starts with /api, it copies the request to the stdin of api.exe and copies the stdout of api.exe back to the client. Otherwise, server.py copies a file to the client over the network (e.g., index.html).
Visual Studio Note: If you are working on Windows and use Visual Studio (not to be confused with Visual Studio Code), compile api.exe from the Ubuntu (WSL) terminal (make api.exe), just for this demo. This avoids a problem with Windows vs. Linux line endings when running server.py.
API Tests
Run all the API tests.
$ make test-api
Submission and grading
Submit these files to the autograder.
List.hppList_tests.cpp
This project will be autograded for correctness, comprehensiveness of your test cases, and programming style. See the style checking tutorial for the criteria and how to check your style automatically on CAEN.
Testing
Check for memory leaks using the Leak checking tutorial.
Run all the unit tests and system tests. This includes the public tests we provided and the unit tests that you wrote.
$ make test
Pro-tip: Run commands in parallel with make -j.
$ make -j4 test
Unit Test Grading
We will autograde your List unit tests.
Your unit tests must use the unit test framework.
A test suite must complete less than 5 seconds and contain 50 or fewer TEST() items. One test suite is one _tests.cpp file.
To grade your unit tests, we use a set of intentionally buggy instructor solutions. You get points for catching the bugs.
- We compile and run your unit tests with a correct solution.
- Tests that pass are valid.
- Tests that fail are invalid, they falsely report a bug.
- We compile and run all of your valid tests against each buggy solution.
- If any of your tests fail, you caught the bug.
- You earn points for each bug that you catch.
Requirements and restrictions
It is our goal for you to gain practice with good C++ code, classes, and dynamic memory.
| DO | DO NOT |
|---|---|
Modify .cpp files and List.hpp |
Modify other .hpp files |
For List, make helper member functions private |
Modify the public interface of List |
Use these libraries: <iostream>, <string>, <cassert>, <sstream>, <utility> |
Use other libraries |
Use <list> (and optionally <algorithm>) in api.cpp |
Use <algorithm>, <list>, or other containers in List.hpp |
#include a library to use its functions |
Assume that the compiler will find the library for you (some do, some don’t) |
| Use C++ strings | Use C-strings |
Send all output to standard out (AKA stdout) by using cout |
Send any output to standard error (AKA stderr) by using cerr |
| Pass large structs or classes by reference | Pass large structs or classes by value |
| Pass by const reference when appropriate | “I don’t think I’ll modify it …” |
| Use the Address Sanitizer to check for memory errors | “It’s probably fine…” |
Acknowledgments
Original project written by Andrew DeOrio awdeorio@umich.edu, winter 2019.
This document is licensed under a Creative Commons Attribution-NonCommercial 4.0 License. You’re free to copy and share this document, but not to sell it. You may not share source code provided with this document.