p5-ml
EECS 280 Project 5: Machine Learning
Spring 2024 release.
Project due 8:00pm EST Monday June 24, 2024.
You may work alone or with a partner (partnership guidelines). If you work alone, you must work alone on both the checkpoint and the full project. If you work with a partner, you must work with the same partner on the checkpoint and the full project. You may not work alone on the checkpoint and then add a partner for the full project.
Introduction
Automatically identify the subject of posts from the EECS 280 Piazza using natural language processing and machine learning techniques.
The learning goals of this project include Function Objects and Recursion. We’ll reinforce learning goals from project 4: Container ADTs, Dynamic Memory, The Big Three, Linked Lists, and Iterators. You will gain experience with recursion, binary trees, templates, comparators, and the map data structure.
For example, your program will be able to read a Piazza post like this and figure out that it’s about Project 3: Euchre.
Setup
Set up your visual debugger and version control, then submit to the autograder.
Visual debugger
During setup, name your project p5-ml. Use this starter files link: https://eecs280staff.github.io/p5-ml/starter-files.tar.gz
| VS Code | Visual Studio | Xcode |
You should end up with a folder with starter files that look like this. You may have already renamed files like Map.hpp.starter to Map.hpp. You may also have a main.cpp file after following the setup tutorial. If not, you will create a main.cpp file in the Classifier section.
$ ls
BinarySearchTree.hpp                instructor_student.out.correct
BinarySearchTree_compile_check.cpp  projects_exam.out.correct
BinarySearchTree_public_tests.cpp    sp16_projects_exam.csv
BinarySearchTree_tests.cpp.starter  test_small.csv
Makefile                            test_small.out.correct
Map.hpp                             test_small_debug.out.correct
Map_compile_check.cpp               train_small.csv
Map_public_tests.cpp                 unit_test_framework.hpp
Map_tests.cpp.starter               w14-f15_instructor_student.csv
TreePrint.hpp                       w16_instructor_student.csv
csvstream.hpp                       w16_projects_exam.csv
Here’s a short description of each starter file.
| File(s) | Description |
|---|---|
BinarySearchTree.hpp.starter |
Starter code for BinarySearchTree. |
BinarySearchTree_tests.cpp.starter |
Your BinarySearchTree unit tests. |
BinarySearchTree_public_tests.cpp |
A small test for BinarySearchTree |
BinarySearchTree_compile_check.cpp |
Compile check test for BinarySearchTree |
TreePrint.hpp |
Test helper function for printing trees. |
Map.hpp.starter |
Starter code for Map. |
Map_tests.cpp.starter |
Your Map unit tests. |
Map_public_tests.cpp |
Your Map unit tests. |
Map_compile_check.cpp |
Compile check test for Map. |
csvstream.hpp |
Library for reading CSV files. |
train_small.csvtest_small.csvtest_small.out.correcttest_small_debug.out.correct |
Sample input and output for the main program. |
sp16_projects_exam.csvw14-f15_instructor_student.csvw16_instructor_student.csvw16_projects_exam.csvinstructor_student.out.correctprojects_exam.out.correct |
Piazza data input from past terms, with correct output. |
Makefile |
Helper commands for building. |
unit_test_framework.hpp |
A simple unit-testing framework. |
Version control
Set up version control using the Version control tutorial.
After you’re done, you should have a local repository with a “clean” status and your local repository should be connected to a remote GitHub repository.
$ git status
On branch main
Your branch is up-to-date with 'origin/main'.

nothing to commit, working tree clean
$ git remote -v
origin	https://github.com/awdeorio/p5-ml.git (fetch)
origin	https://githubcom/awdeorio/p5-ml.git (push)
You should have a .gitignore file (instructions).
$ head .gitignore
# This is a sample .gitignore file that's useful for C++ projects.
...
Group registration
Register your partnership (or working alone) on the Autograder. Then, submit the code you have.
BinarySearchTree
A binary search tree supports efficiently storing and searching for elements.
Write implementations in BinarySearchTree.hpp for each _impl function. The file already contains function stubs and you should replace the assert(false) with your code. For example:
static bool empty_impl(const Node *node) {
  assert(false);  // Replace with your code
}
Run the public Binary Search Tree tests.
$ make BinarySearchTree_compile_check.exe
$ make BinarySearchTree_public_tests.exe
$ ./BinarySearchTree_public_tests.exe
Write tests for BinarySearchTree in BinarySearchTree_tests.cpp using the Unit Test Framework. You’ll submit these tests to the autograder. See the Unit Test Grading section.
$ make BinarySearchTree_tests.exe
$ ./BinarySearchTree_tests.exe
Submit BinarySearchTree.hpp and BinarySearchTree_tests.cpp to the autograder.
Setup
Rename these files (VS Code (macOS), VS Code (Windows), Visual Studio, Xcode, CLI):
BinarySearchTree.hpp.starter->BinarySearchTree.hppBinarySearchTree_tests.cpp.starter->BinarySearchTree_tests.cpp
The BinarySearchTree tests should compile and run. The public tests and compile check will fail until you implement the functions. The test you write (BinarySearchTree_tests.cpp) will pass because the starter file only contains ASSERT_TRUE(true).
$ make BinarySearchTree_compile_check.exe
$ make BinarySearchTree_public_tests.exe
$ ./BinarySearchTree_public_tests.exe
$ make BinarySearchTree_tests.exe
$ ./BinarySearchTree_tests.exe
Configure your IDE to debug either the public tests or your own tests.
| Public tests | Your own tests | |
|---|---|---|
| VS Code (macOS) |
Set program name to: |
Set program name to: |
| VS Code (Windows) |
Set program name to: |
Set program name to: |
| Xcode |
Include compile sources: |
Include compile sources: |
| Visual Studio |
Exclude files from the build:
|
Exclude files from the build:
|
Template Parameters
BinarySearchTree has two template parameters:
T- The type of elements stored within the tree.Compare- The type of comparator object (a functor) that should be used to determine whether one element is less than another. The default type isstd::less<T>, which compares twoTobjects with the<operator. To compare elements in a different fashion, a custom comparator type must be specified.
No Duplicates Invariant
In the context of this project, duplicate values are NOT allowed in a BST. This does not need to be the case, but it avoids some distracting complications.
Sorting Invariant
A binary search tree is special in that the structure of the tree corresponds to a sorted ordering of elements and allows efficient searches (i.e. in logarithmic time).
Every node in a well-formed binary search tree must obey this sorting invariant:
- It represents an empty tree (i.e. a null
Node*).
- OR -
-
The left subtree obeys the sorting invariant, and every element in the left subtree is less than the root element (i.e. this node).
- AND -
The right subtree obeys the sorting invariant, and the root element (i.e. this node) is less than every element in the right subtree.
Put briefly, go left and you’ll find smaller elements. Go right and you’ll find bigger ones. For example, the following are all well-formed sorted binary trees:
flowchart TB
  %% Binary tree 2
  subgraph tree2["Valid"]
    direction TB
    tree2_1((1)) --> tree2_1_L((" ")) & tree2_2((2))
    tree2_2 --> tree2_2_L((" ")) & tree2_4((4))
    tree2_4 --> tree2_4_L((" ")) & tree2_4_R((" "))
  end

  %% Binary tree 1
  subgraph tree1["Valid"]
    direction TB
    tree1_4((4)) --> tree1_2((2)) & tree1_6((6))
    tree1_2 --> tree1_1((1)) & tree1_3((3))
    tree1_1 --> tree1_1_L((" ")) & tree1_1_R((" "))
    tree1_3 --> tree1_3_L((" ")) & tree1_3_R((" "))

    tree1_6 --> tree1_5((5)) & tree1_7((7))
    tree1_5 --> tree1_5_L((" ")) & tree1_5_R((" "))
    tree1_7 --> tree1_7_L((" ")) & tree1_7_R((" "))
  end
While the following are not:
flowchart TB
  %% Binary tree 4
  subgraph tree4["Invalid"]
    direction TB
    tree4_3((3)) --> tree4_2((2)) & tree4_7((7))
    tree4_2 --> tree4_1((1)) & tree4_5((5))
    tree4_1 --> tree4_1_L((" ")) & tree4_1_R((" "))
    tree4_5 --> tree4_5_L((" ")) & tree4_5_R((" "))
  end

  %% Binary tree 3
  subgraph tree3["Invalid"]
    direction TB
    tree3_4((4)) --> tree3_3((3)) & tree3_6((6))
    tree3_3 --> tree3_2((2)) & tree3_1((1))
    tree3_2 --> tree3_2_L((" ")) & tree3_2_R((" "))
    tree3_1 --> tree3_1_L((" ")) & tree3_1_R((" "))

    tree3_6 --> tree3_7((7))
    tree3_7 --> tree3_7_L((" ")) & tree3_7_R((" "))
  end

  %% Binary tree 2
  subgraph tree2["Invalid"]
    direction TB
    tree2_1((1)) --> tree2_2((2)) & tree2_3((3))
    tree2_2 --> tree2_2_L((" ")) & tree2_2_R((" "))
    tree2_3 --> tree2_3_L((" ")) & tree2_3_R((" "))
  end

  %% Binary tree 1
  subgraph tree1["Invalid"]
    direction TB
    tree1_1((1)) --> tree1_2((2)) & tree1_1_R((" "))
    tree1_2 --> tree1_2_L((" ")) & tree1_2_R((" "))
  end
ProTip: When writing tests for check_sorting_invariant(), you can use
an iterator to break the invariant. For example:
BinarySearchTree<int> b;
b.insert(1);
b.insert(0);
// change first datum to 2, resulting in the first broken tree above
*b.begin() = 2;
ASSERT_FALSE(b.check_sorting_invariant());
Data Representation
The data representation for BinarySearchTree is a tree-like structure of
nodes similar to that described in lecture. Each Node contains an
element and pointers to left and right subtrees. The structure is
self-similar. A null pointer indicates an empty tree. You must use this
data representation. Do not add member variables to BinarySearchTree or
Node.
Public Member Functions and Iterator Interface
The public member functions and iterator interface for
BinarySearchTree are already implemented in the starter code. DO NOT
modify the code for any of these functions. They delegate the work to
private, static implementation functions, which you will write.
Implementation Functions
The core of the implementation for BinarySearchTree is a collection of
private, static member functions that operate on tree-like structures of
nodes. You are responsible for writing the implementation of several of
these functions.
To disambiguate these implementation functions from the public interface
functions, we have used names ending with _impl. (This is not
strictly necessary, because the compiler can differentiate them based on
the Node* parameter.)
There are a few keys to thinking about the implementation of these functions:
- The functions have no idea that such a thing as the
BinarySearchTreeclass exists, and they shouldn’t. A “tree” is not a class, but simply a tree-shaped structure ofNodes. The parameter node points to the root of these nodes. - A recursive implementation depends on the idea of similar subproblems, so a “subtree” is just as much a tree as the “whole tree”. That means you shouldn’t need to think about “where you came from” in your implementation.
- Every function should have a base case! Start by writing this part.
- You only need to think about one “level” of recursion at a time. Avoid thinking about the contents of subtrees and take the recursive leap of faith.
We’ve structured the starter code so that the first bullet point above
is actually enforced by the language. Because they are static member
functions, they do not have access to a receiver object (i.e. there’s no
this pointer). That means it’s actually impossible for these functions
to try to do something bad with the BinarySearchTree object (e.g. trying
to access the root member variable).
Instead, the implementation functions are called from the regular member
functions to perform specific operations on the underlying nodes and
tree structure, and are passed only a pointer to the root Node of the
tree/subtree they should work with.
The empty_impl function must run in constant time. It must must be able
to determine and return its result immediately, without using either
iteration or recursion. The rest of the implementation functions must be
recursive. There are additional requirements on the kind of recursion
that must be used for some functions. See comments in the starter code
for details. Iteration (i.e. using loops) is not allowed in any of the
_impl functions.
Using the Comparator
The _impl functions that need to compare data take in a comparator
parameter called less. Make sure to use less rather than the < operator
to compare elements!
The insert_impl Function
The key to properly maintaining the sorting invariant lies in the
implementation of the insert_impl function - this is essentially where
the tree is built, and this function will make or break the whole ADT.
Your insert_impl function should follow this procedure:
- Handle an originally empty tree as a special case.
- Insert the element into the appropriate place in the tree, keeping
in mind the sorting invariant. You’ll need to compare elements for
this, and to do so make sure to use the
lesscomparator passed in as a parameter. - Use the recursive leap of faith and call
insert_implitself on the left or right subtree. Hint: You do need to use the return value of the recursive call. (Why?)
Important: When recursively inserting an item into the left or right subtree, be sure to replace the old left or right pointer of the current node with the result from the recursive call. This is essential, because in some cases the old tree structure (i.e. the nodes pointed to by the old left or right pointer) is not reused. Specifically, if the subtree is empty, the only way to get the current node to “know” about the newly allocated node is to use the pointer returned from the recursive call.
Technicality: In some cases, the tree structure may become unbalanced (i.e. too many nodes on one side of the tree, causing it to be much deeper than necessary) and prevent efficient operation for large trees. You don’t have to worry about this.
Testing
Pro-tip: When writing tests for functions that return a size_t (which is an unsigned integer type), compare against an unsigned literal. For example:
BinarySearchTree<int> b;
ASSERT_EQUAL(b.height(), 0u);
Map
Write a map abstract data type (ADT). Map is an associative container, and works just like std::map.
Write implementations at the end of Map.hpp for the functions declared at the beginning of Map.hpp. The most important functions are find, insert, and the [] operator.
Your implementations should not require much code. Reuse the functionality provided by BinarySearchTree.
Run the public Map tests.
$ make Map_compile_check.exe
$ make Map_public_tests.exe
$ ./Map_public_tests.exe
Write tests for Map in Map_tests.cpp using the Unit Test Framework. While you should write your own tests for Map to ensure that your implementation is correct, you do not have to submit your tests to the autograder.
$ make Map_tests.exe
$ ./Map_tests.exe
Submit Map.hpp to the autograder. Don’t forget to include the code you finished earlier, BinarySearchTree.hpp and BinarySearchTree_tests.cpp.
Setup
Rename these files (VS Code (macOS), VS Code (Windows), Visual Studio, Xcode, CLI):
Map.hpp.starter->Map.hppMap_tests.cpp.starter->Map_tests.cpp
Edit Map.hpp, adding a function stub for every function prototype in Map. Here are a few examples to get you started. We’re using K, V, and C as shorthands for Key_type, Value_type, and Key_compare.
template <typename K, typename V, typename C>
bool Map<K, V, C>::empty() const {
  assert(false);
}

template <typename K, typename V, typename C>
typename Map<K, V, C>::Iterator Map<K, V, C>::find(const K& k) const {
  assert(false);
}

template <typename K, typename V, typename C>
V& Map<K, V, C>::operator[](const K& k) {
  assert(false);
}

template <typename K, typename V, typename C>
std::pair<typename Map<K, V, C>::Iterator, bool> Map<K, V, C>::insert(const Pair_type &val) {
  assert(false);
}
Now you should be able to compile and run the Map unit tests. The public tests will fail until you implement the functions.
$ make Map_compile_check.exe
$ make Map_public_tests.exe
$ ./Map_public_tests.exe
Configure your IDE to debug either the public tests or your own tests. Writing your own tests for Map is optional.
| Public tests | Your own tests | |
|---|---|---|
| VS Code (macOS) |
Set program name to: |
Set program name to: |
| VS Code (Windows) |
Set program name to: |
Set program name to: |
| Xcode |
Include compile sources: |
Include compile sources: |
| Visual Studio |
Exclude files from the build:
|
Exclude files from the build:
|
Map Examples
A map is an associative container. It stores two types, key and value. Our map works just like std::map.
Map<string, double> words;
std::map<string, double> words;
One way to use a map is a lot like an array.
words["hello"] = 1;
Maps store a std::pair type, which “glues” one key to one value. The computer science term is Tuple, a fixed-size heterogeneous container.
pair<string, double> tuple;
tuple.first = "world";
tuple.second = 2;
words.insert(tuple);
Here’s a more compact way to insert a pair.
words.insert({"pi", 3.14159});
The range-for loop makes it easier to iterate over a map.
for (const auto &kv : words) {
  const auto &word = kv.first; //key
  auto number = kv.second; //value
  cout << word << " " << number << endl;
}
You can check if a key is in the map. The find() function returns an iterator.
auto found_it = words.find("pi");
if (found_it != words.end()) {
  const auto &word = (*found_it).first; //key
  auto number = (*found_it).second; //value
  cout << "found " << word << " " << number << endl;
}
When using the [] notation, an element not found is automatically created. If the value type of the map is numeric, it will always be 0 by default.
cout << "bleh: " << words["bleh"] << endl;
Building on the BST
The operation of a map is quite similar to that of a BST. The additional
consideration for a map is that we want to store key-value pairs instead
of single elements, but also have any comparisons (e.g. for searching)
only depend on the key and be able to freely change the stored values
without messing up the BST sorting invariant. We can employ the has-a
pattern using a BinarySearchTree as the data representation for Map:
-
BST template parameter:
TInstantiate with:
Pair_typeWe’ve provided a using declaration in the starter code for
Pair_type:using Pair_type = std::pair<Key_type, Value_type>;std::pairis basically like a struct that stores two objects together.Key_typeandValue_typeare whatever template parameters were used to instantiateMap. -
BST template parameter:
CompareInstantiate with:
PairCompYou’ll need to define your own comparator by declaring a functor type called
PairComp(or whatever you want to call it) in yourMapclass. The overloaded()operator should accept two objects ofPair_typeand return whether the key of the LHS is less than the key of the RHS (according toKey_compare).
Finally, we can even reuse the iterators from the BST class, since the
interface we want (based on std::map) calls for iterators to yield a
key-value pair when dereferenced. Since the element type T of the BST is
our Pair_type, BST iterators will yield pairs and will work just fine.
We’ve provided this using declaration with the starter code to make
Map::Iterator simply an alias for iterators from the corresponding BST:
using Iterator = typename BinarySearchTree<Pair_type, PairComp>::Iterator;
ML and NLP Background
Pro-tip: Skim this section the first time through. Refer back to it while you’re coding the Classifier.
Machine Learning and Classification
The goal for this project is to write an intelligent program that can classify Piazza posts according to topic. This task is easy for humans - we simply read and understand the content of the post, and the topic is intuitively clear. But how do we compose an algorithm to do the same? We can’t just tell the computer to “look at it” and understand. This is typical of problems in artificial intelligence and natural language processing.

We know this is about Euchre, but how can we write an algorithm that “knows” that?
With a bit of introspection, we might realize each individual word is a bit of evidence for the topic about which the post was written. Seeing a word like “card” or “spades” leads us toward the Euchre project. We judge a potential label for a post based on how likely it is given all the evidence. Along these lines, information about how common each word is for each topic essentially constitutes our classification algorithm.
But we don’t have that information (i.e. that algorithm). You could try to sit down and write out a list of common words for each project, but there’s no way you’ll get them all. For example, the word “lecture” appears much more frequently in posts about exam preparation. This makes sense, but we probably wouldn’t come up with it on our own. And what if the projects change? We don’t want to have to put in all that work again.
Instead, let’s write a program to comb through Piazza posts from previous terms (which are already tagged according to topic) and learn which words go with which topics. Essentially, the result of our program is an algorithm! This approach is called (supervised) machine learning. Once we’ve trained the classifier on some set of Piazza posts, we can apply it to new ones written in the future.
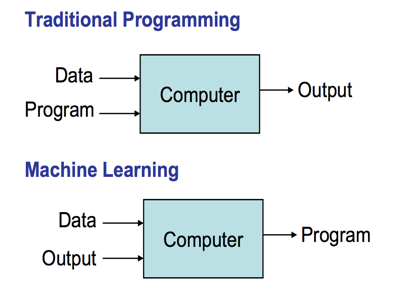
At a high level, the classifier we’ll implement works by assuming a probabilistic model of how Piazza posts are composed, and then finding which label (e.g. our categories of “euchre”, “exam”, etc.) is the most probable source of a particular post.
All the details of natural language processing (NLP) and machine learning (ML) techniques you need to implement the project are described here. You are welcome to consult other resources, but there are many kinds of classifiers that have subtle differences. The classifier we describe here is a simplified version of a “Multi-Variate Bernoulli Naive Bayes Classifier”. If you find other resources, but you’re not sure they apply, make sure to check them against this specification.
This document provides a more complete description of the way the classifier works, in case you’re interested in the math behind the formulas here.
Piazza Dataset
For this project, we retrieved archived Piazza posts from EECS 280 in past terms. We will focus on two different ways to divide Piazza posts into labels (i.e. categories).
-
By topic. Labels: “exam”, “calculator”, “euchre”, “image”, “recursion”, “statistics”
Example: Posts extracted from
w16_projects_exam.csvlabel content exam will final grades be posted within 72 hours calculator can we use the friend class list in stack euchre weird problem when i try to compile euchrecpp image is it normal for the horses tests to take 10 minutes recursion is an empty tree a sorted binary tree statistics are we supposed to have a function for summary … … -
By author. Labels: “instructor”, “student”
Example: Posts extracted from
w14-f15_instructor_student.csvlabel content instructor disclaimer not actually a party just extra OH student how can you use valgrind with calccpp student could someone explain to me what the this keyword means … …
The Piazza datasets are Comma Separated Value (CSV) files. The label for
each post is found in the “tag” column, and the content in the
“content” column. There may be other columns in the CSV file; your
code should ignore all but the “tag” and “content” columns. You may
assume all Piazza files are formatted
correctly, and that post content and labels only contain lowercase
characters, numbers, and no punctuation. You must use the
csvstream.hpp library (see
https://github.com/awdeorio/csvstream for
documentation) to read CSV files in your application. The
csvstream.hpp file itself is included with the starter code.
Your classifier should not hardcode any labels. Instead, it should use the exact set of labels that appear in the training data.
Pro-tip: Here’s how to split a string into words. You may use this code as given.
// EFFECTS: Return a set of unique whitespace delimited words
set<string> unique_words(const string &str) {
  istringstream source(str);
  set<string> words;
  string word;
  while (source >> word) {
    words.insert(word);
  }
  return words;
}
We have included several Piazza datasets with the project:
train_small.csv- Made up training data intended for small-scale testing.test_small.csv- Made up test data intended for small-scale testing.w16_projects_exam.csv- (Train) Real posts from W16 labeled by topic.sp16_projects_exam.csv- (Test) Real posts from Sp16 labeled by topic.w14-f15_instructor_student.csv- (Train) Real posts from four terms labeled by author.w16_instructor_student.csv- (Test) Real posts from W16 Piazza labeled by author.
For the real datasets, we have indicated which are intended for training vs. testing.
Bag of Words Model
We will treat a Piazza post as a “bag of words” - each post is simply characterized by which words it includes. The ordering of words is ignored, as are multiple occurrences of the same word. These two posts would be considered equivalent:
- “the left bower took the trick”
- “took took trick the left bower bower”
Thus, we could imagine the post-generation process as a person sitting down and going through every possible word and deciding which to toss into a bag.
Conditional Probability
We write \(P(A)\) to denote the probability (a number between 0 and 1) that some event \(A\) will occur. \(P(A \mid B)\) denotes the probability that event \(A\) will occur given that we already know event \(B\) has occurred. For example, \(P(bower \mid euchre) \approx 0.007\). This means that if a Piazza post is about the euchre project, there is a 0.7% chance it will contain the word bower (we should say “at least once”, technically, because of the bag of words model).
Training
Before the classifier can make predictions, it needs to be trained on a
set of previously labeled Piazza posts (e.g. train_small.csv or
w16_projects_exam.csv). Your application should process each post in
the training set, and record the following information:
- The total number of posts in the entire training set.
- The number of unique words in the entire training set. (The vocabulary size.)
- For each word \(w\), the number of posts in the entire training set that contain \(w\).
- For each label \(C\), the number of posts with that label.
- For each label \(C\) and word \(w\), the number of posts with label \(C\) that contain \(w\).
Prediction
How do we predict a label for a new post?
Given a new Piazza post \(X\), we must determine the most probable label \(C\), based on what the classifier has learned from the training set. A measure of the likelihood of \(C\) is the log-probability score given the post:
\[\ln P(C) + \ln P(w_1 \mid C) + \ln P(w_2 \mid C) + \cdots + \ln P(w_n \mid C)\]Important: Because we’re using the bag-of-words model, the words \(w_1, w_2, \ldots, w_n\) in this formula are only the unique words in the post, not including duplicates! To ensure consistent results, make sure to add the contributions from each word in alphabetic order.
The classifier should predict whichever label has the highest log-probability score for the post. If multiple labels are tied, predict whichever comes first alphabetically.
\(\ln P(C)\) is the log-prior probability of label \(C\) and is a reflection of how common it is:
\[\ln P(C) = \ln \left( \frac{\text{number of training posts with label } C}{\text{number of training posts}} \right)\]\(\ln P(w \mid C)\) is the log-likelihood of a word \(w\) given a label \(C\), which is a measure of how likely it is to see word \(w\) in posts with label \(C\). The regular formula for \(\ln P(w \mid C)\) is:
\[\ln P(w \mid C) = \ln \left( \frac{\text{number of training posts with label } C \text{ that contain } w}{\text{number of training posts with label } C} \right)\]However, if \(w\) was never seen in a post with label \(C\) in the training data, we get a log-likelihood of \(-\infty\), which is no good. Instead, use one of these two alternate formulas:
\[\ln P(w \mid C) = \ln \left( \frac{\text{number of training posts that contain } w}{\text{number of training posts}} \right)\]
(Use when \(w\) does not occur in posts labeled \(C\) but does occur in the training data overall.)
\[\ln P(w \mid C) = \ln \left( \frac{1}{\text{number of training posts}} \right)\]
(Use when \(w\) does not occur anywhere at all in the training set.)
Classifier
Write the classifier in main.cpp using the bag of words model.
Run the classifier on a small dataset.
$ ./main.exe train_small.csv test_small.csv
Setup
If you created a main.cpp while following the setup tutorial, you’ll use it in this section. Otherwise, create a new file main.cpp (VS Code (macOS), VS Code (Windows), Visual Studio, Xcode, CLI).
Add “hello world” code if you haven’t already.
#include <iostream>
using namespace std;

int main() {
  cout << "Hello World!\n";
}
The main program should compile and run.
$ make main.exe
$ ./main.exe
Hello World!
Configure your IDE to debug the main program.
| VS Code (macOS) |
Set program name to: |
| VS Code (Windows) |
Set program name to: |
| Xcode |
Include compile sources: |
| Visual Studio |
Exclude files from the build:
|
Configure command line arguments (VS Code (macOS), VS Code (Windows), Xcode, Visual Studio). We recommend starting with the smallest input and enabling debug output, train_small.csv test_small.csv --debug.
To compile and run the smallest input at the command line:
$ make main.exe
$ ./main.exe train_small.csv test_small.csv --debug
Command Line Interface
Here is the usage message for the top-level application:
$ ./main.exe
Usage: main.exe TRAIN_FILE TEST_FILE [--debug]
The main application always requires files for both training and testing. The training file must have at least one post, but the test file may have no posts. You may assume all files are in the correct format, with a header that has at least the “tag” and “content” columns.
Use the provided small-scale files for initial testing and to check your output formatting:
$ ./main.exe train_small.csv test_small.csv
$ ./main.exe train_small.csv test_small.csv --debug
Correct output is in test_small.out.correct and
test_small_debug.out.correct. The output format is discussed in detail below.
Error Checking
The program checks that the command line arguments obey the following rules:
- There are 3 or 4 arguments, including the executable name itself
(i.e.
argv[0]). - The fourth argument (i.e.
argv[3]), if provided, must be--debug.
If any of these are violated, print out the usage message and then quit
by returning a non-zero value from main. Do not use the exit
library function, as this fails to clean up local objects.
cout << "Usage: main.exe TRAIN_FILE TEST_FILE [--debug]" << endl;
If any file cannot be opened, print out the following message, where
filename is the name of the file that could not be opened, and quit by
returning a non-zero value from main.
cout << "Error opening file: " << filename << endl;
You do not need to do any error checking for command-line arguments or file I/O other than what is described on this page. However, you must use precisely the error messages given here in order to receive credit. (Just literally use the code given here to print them.)
As mentioned earlier, you may assume all Piazza data files are in the correct format.
Design
Here is some high-level guidance:
- First, your application should read posts from a file (e.g.
train_small.csv) and use them to train the classifier. After training, your classifier abstraction should store the information mentioned in the Training section. - Your classifier should be able to compute the log-probability score of a post (i.e. a collection of words) given a particular label. To predict a label for a new post, it should choose the label that gives the highest log-probability score. See the Prediction section.
- Read posts from a file (e.g.
test_small.csv) to use as testing data. For each post, predict a label using your classifier.
Some of these steps have output associated with them. See the “output” section below for the details.
The structure of your classifier application, including which procedural abstractions and/or ADTs to use for the classifier, is entirely up to you. Make sure your decisions are informed by carefully considering the classifier and top-level application described in this specification.
We strongly suggest you make a class to represent the classifier - the private data members for the class should keep track of the classifier parameters learned from the training data, and the public member functions should provide an interface that allows you to train the classifier and make predictions for new piazza posts.
You should write RMEs and appropriate comments to describe the interfaces for the abstractions you choose (ADTs, classes, functions, etc.). You should also write unit tests to verify each component works on its own.
You are welcome to use any part of the STL in your top-level classifier
application. In particular, std::map and std::set will be
useful.
Warning: Use std::map in your classifier. Our implementation of Map is not fast enough.
Example
We’ve provided full example output for a small input (train_small.csv and test_small.csv). The output is in test_small.out.correct. The output with debug is in test_small_debug.out.correct, here we’ve indicated debug output with “(DEBUG)”. Some lines are indented by two spaces.
To run this example at the command line:
$ make main.exe
$ ./main.exe train_small.csv test_small.csv
$ ./main.exe train_small.csv test_small.csv --debug
Pro-tip: Debug output differences diff -y -B, which shows differences side-by-side and ignores whitespace. We’ll use the less pager so we can scroll through the long terminal output. Press q to quit.
$ make main.exe
$ ./main.exe train_small.csv test_small.csv --debug > test_small_debug.out
$ diff -y -B test_small_debug.out test_small_debug.out.correct | less  # q to quit
Add this line at the beginning of your main function to set floating point precision:
cout.precision(3);
First, print information about the training data:
- (DEBUG) Line-by-line, the label and content for each training document.
training data: label = euchre, content = can the upcard ever be the left bower label = euchre, content = when would the dealer ever prefer a card to the upcard label = euchre, content = bob played the same card twice is he cheating ... label = calculator, content = does stack need its own big three label = calculator, content = valgrind memory error not sure what it means - The number of training posts.
trained on 8 examples - (DEBUG) The vocabulary size (the number of unique words in all training content).
vocabulary size = 49 - An extra blank line
If the debug option is provided, also print information about the classifier trained on the training posts. Whenever classes or words are listed, they are in alphabetic order.
- (DEBUG) The classes in the training data, and the number of examples for each.
classes: calculator, 3 examples, log-prior = -0.981 euchre, 5 examples, log-prior = -0.47 - (DEBUG) For each label, and for each word that occurs for that label: The
number of posts with that label that contained the word, and the
log-likelihood of the word given the label.
classifier parameters: calculator:assert, count = 1, log-likelihood = -1.1 calculator:big, count = 1, log-likelihood = -1.1 ... euchre:twice, count = 1, log-likelihood = -1.61 euchre:upcard, count = 2, log-likelihood = -0.916 ... - (DEBUG) An extra blank line
Finally, use the classifier to predict classes for each example in the testing data. Print information about the test data as well as these predictions.
- Line-by-line, the “correct” label, the predicted label and its log-probability
score, and the content for each test. Insert a blank line after each for
readability.
test data: correct = euchre, predicted = euchre, log-probability score = -13.7 content = my code segfaults when bob is the dealer correct = euchre, predicted = calculator, log-probability score = -12.5 content = no rational explanation for this bug correct = calculator, predicted = calculator, log-probability score = -13.6 content = countif function in stack class not working - The number of correct predictions and total number of test posts.
performance: 2 / 3 posts predicted correctly
The last thing printed should be a newline character.
Accuracy
In case you’re curious, here’s the accuracy for the large datasets. Not too bad!
| Command | Accuracy |
|---|---|
./main.exe w16_projects_exam.csv sp16_projects_exam.csv |
245 / 332 |
./main.exe w14-f15_instructor_student.csv w16_instructor_student.csv |
2602 / 2988 |
Efficiency
While efficiency is not a primary goal for this project, you should aim for your code to run the largest test case above in no more than a minute. Some common causes of slowdown you should avoid:
- Processing a post more than once (including reading it more than once or saving all the data in a vector).
- Iterating over a map to find something rather than using
[]orfind(). - Passing strings, pairs, or containers by value.
- Iterating by value in a range-based for loop.
Refer to the Project 2 perf
tutorial
for instructions on how to use the perf tool to identify slow
functions.
Submission and Grading
Submit these files to the autograder.
BinarySearchTree.hppBinarySearchTree_tests.cppMap.hppmain.cpp
You do not have to submit Map_tests.cpp to the autograder.
This project will be autograded for correctness, comprehensiveness of your test cases, and programming style. See the style checking tutorial for the criteria and how to check your style automatically on CAEN.
Testing
Run all the unit tests and system tests. This includes the public tests we provided and the unit tests that you wrote.
$ make test
Pro-tip: Run commands in parallel with make -j.
$ make -j4 test
Unit Test Grading
We will autograde your BinarySearchTree unit tests.
Your unit tests must use the unit test framework.
A test suite must complete less than 5 seconds and contain 50 or fewer TEST() items. One test suite is one _tests.cpp file.
To grade your unit tests, we use a set of intentionally buggy instructor solutions. You get points for catching the bugs.
- We compile and run your unit tests with a correct solution.
- Tests that pass are valid.
- Tests that fail are invalid, they falsely report a bug.
- We compile and run all of your valid tests against each buggy solution.
- If any of your tests fail, you caught the bug.
- You earn points for each bug that you catch.
Requirements and Restrictions
| DO | DO NOT |
|---|---|
Put all top-level application code in main.cpp. |
Create additional files other than main.cpp. |
| Create any ADTs or functions you wish for your top-level classifier application. | Modify the BinarySearchTree or Map public interfaces |
Use any part of the STL for your top level classifier application, including map and set. |
Use STL containers in your implementation of BinarySearchTree or Map. |
Use any part of the STL except for containers in your BinarySearchTree and Map implementations. |
Use your Map implementation for the top level application. It will be too slow. |
Use recursion for the BST _impl functions. |
Use iteration for the BST _impl functions. |
| Follow course style guidelines. | Use non-const static or global variables. |
| Check for undefined behavior using address sanitizer and other tools | “It runs fine on my machine!” |
Acknowledgments
Andrew DeOrio and James Juett wrote the original project and specification. Amir Kamil contributed to code structure, style, and implementation details. This project was developed for EECS 280, Fall 2016 at the University of Michigan.